
 Pin it
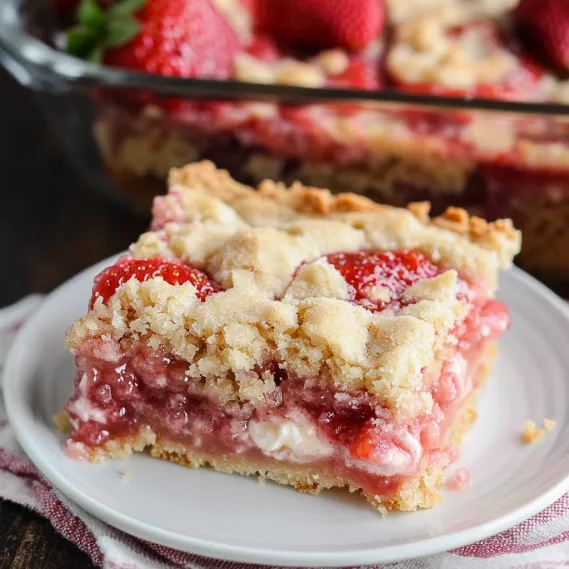
These strawberry pie bars combine three irresistible layers into one perfect dessert: a buttery shortbread crust, a creamy strawberry-studded filling, and a golden crumbly topping. Each bite delivers the perfect balance of textures – crisp, creamy, and fruity – creating a portable version of strawberry pie that's even more satisfying. The bright, sweet strawberries shine against the rich, buttery backdrop, making these bars taste like summer sunshine no matter the season. Perfect for potlucks, picnics, or simply enjoying with your afternoon coffee, these bars bring together simple ingredients to create something truly special.
I first made these bars when looking for a dessert to bring to a summer potluck that wouldn't melt or require refrigeration. They were such a hit that three people asked for the recipe before the event was over! What makes these bars special is the contrast between the crisp, buttery shortbread and the creamy, sweet filling loaded with fresh strawberries. Even my father-in-law, who claims not to like desserts, had seconds.
Essential Ingredients and Selection Tips
- Fresh Strawberries: Choose ripe, fragrant berries with a deep red color. If they don't smell sweet, they won't taste sweet.
- Butter: Use real butter, not margarine, for the best flavor and texture in the crust. Make sure it's well-chilled.
- Sour Cream: Provides tanginess and creaminess to the filling. Full-fat works best for the richest texture.
- All-Purpose Flour: Creates structure in both the crust and filling. Measure by spooning into measuring cups and leveling for accuracy.
- Granulated Sugar: Balances the tartness of the berries and sour cream. Don't reduce the amount, as it's needed for proper consistency.
The quality of your strawberries makes a tremendous difference in these bars. I've found that smaller, local berries often have more intense flavor than the large, commercially grown varieties. If your strawberries aren't particularly sweet or flavorful, add 1/2 teaspoon of pure vanilla extract to the filling to enhance their natural sweetness.
Detailed Cooking Instructions
- Step 1: Prepare The Perfect Crust
- Preheat your oven to 350°F and grease a 7x11-inch (2-quart) glass baking dish. In a large bowl, combine 1 1/2 cups all-purpose flour, 3/4 cup granulated sugar, and a pinch of salt. Cut in 1 1/2 sticks (3/4 cup) chilled, cubed butter using a pastry blender or your fingertips until the mixture resembles coarse crumbs. Reserve 3/4 cup of this mixture for the topping, then firmly press the remainder into the bottom of your prepared baking dish to form an even crust.
- Step 2: Pre-Bake For Crispness
- Bake the crust for exactly 15 minutes until it's just beginning to set but not yet browned. This par-baking step ensures the bottom crust stays crisp, not soggy, once the filling is added. While the crust bakes, prepare your filling and dice the strawberries. Remove the crust from the oven but keep the oven on at the same temperature.
- Step 3: Create The Creamy Filling
- In a large bowl, whisk 2 large eggs until well beaten. Add 1 cup granulated sugar, 1/2 cup sour cream, 1/3 cup all-purpose flour, and a pinch of salt, whisking until completely smooth with no lumps. This creates a custard-like base that will set up around the berries as it bakes. Gently fold in 3 cups of diced fresh strawberries, being careful not to crush them.
- Step 4: Assemble The Layers
- Pour the strawberry filling evenly over the par-baked crust, spreading it to the edges. Sprinkle the reserved crust mixture over the top, creating a crumbly, streusel-like topping. Don't press the topping down – the irregular texture creates delicious crispy bits as it bakes.
- Step 5: Bake To Golden Perfection
- Bake for 45-55 minutes until the topping is golden brown and the filling is set (it should no longer jiggle in the center when gently shaken). Allow the bars to cool completely in the pan for at least one hour before cutting into squares. This cooling time is crucial for the filling to fully set and achieve the perfect texture.
 Pin it
I learned the importance of thoroughly cooling these bars the hard way. The first time I made them, I was impatient and cut them while still warm. The filling hadn't set properly, creating a delicious but messy situation! Now I always make them a day ahead, allowing them to cool completely and then chill in the refrigerator overnight. The patience is rewarded with perfectly sliceable bars and even better flavor.
The Perfect Strawberry Selection
The star of these bars is unquestionably the strawberries, and their quality dramatically impacts the final result. Through many batches, I've discovered that the best approach is to use berries that are fully ripe but still firm. Overripe, mushy berries release too much liquid and can make the filling soggy. I prefer to dice the strawberries into approximately 1/2-inch pieces – small enough to distribute evenly throughout the filling but large enough to provide bursts of strawberry flavor in every bite. If you're making these bars outside of peak strawberry season and can only find less flavorful berries, try macerating them before using: toss the diced berries with 2 tablespoons of sugar and let them sit for 30 minutes, then drain any excess liquid before folding them into the filling mixture. This brings out their natural sweetness and intensifies the flavor.
 Pin it
Seasonal Variations Worth Trying
While the classic strawberry version is perfect for spring and summer, I've adapted this versatile recipe for every season with delicious results. In late summer, replace the strawberries with fresh blueberries for a traditional blueberry pie bar that's equally delicious. Fall brings the opportunity to use diced apples tossed with cinnamon and nutmeg (pre-cook them slightly to ensure tenderness). Winter is perfect for a cranberry-orange version, using 2 cups of chopped fresh cranberries mixed with 1 cup of diced oranges and increasing the sugar to 1 1/4 cups to balance the tartness. My family's personal favorite variation combines strawberries and rhubarb in a 2:1 ratio, creating the perfect sweet-tart balance that makes an exceptional spring dessert when both are just coming into season.
Perfect Pairings And Serving Ideas
While these bars are delicious on their own, there are several accompaniments that elevate them to an extra-special dessert. For a simple but elegant presentation, serve them with a dollop of lightly sweetened whipped cream and a fresh strawberry fan. If you're feeling indulgent, a scoop of high-quality vanilla ice cream alongside a warm bar (just 15 seconds in the microwave) creates an irresistible contrast of temperatures and textures. For brunch or afternoon tea, I serve these bars with a strawberry-infused whipped cream cheese spread that complements them beautifully. Coffee lovers in my family insist that these bars pair perfectly with a rich, dark roast that balances the sweetness of the dessert. For special occasions, I create a strawberry sauce drizzle by pureeing strawberries with a touch of sugar and reducing the mixture until thickened.
Make-Ahead And Storage Success
One of the things I love most about these bars is how well they keep and how perfect they are for advance preparation. After cooling completely, they can be refrigerated in an airtight container for up to three days, making them ideal for busy hosts or potluck contributions. For longer storage, these bars freeze surprisingly well – wrap individual portions in plastic wrap and then aluminum foil, and freeze for up to two months. Thaw overnight in the refrigerator for the best texture. I often make a double batch specifically to freeze half, providing a delicious homemade dessert option for unexpected guests or last-minute invitations. For the prettiest presentation after storage, dust the tops lightly with powdered sugar just before serving to refresh their appearance.
 Pin it
These strawberry pie bars have become my signature dessert for summer gatherings, the recipe friends and family request most often. There's something magical about the combination of buttery crust and fresh berries that captures the essence of summer in each bite. The beauty of this recipe lies in its wonderful combination of simplicity and impressive results – even novice bakers can create these bars with confidence, while experienced bakers appreciate the perfect balance of flavors and textures that make them so special.
Frequently Asked Questions
- → Cold butter reason?
- Makes a tender crumble.
- → Smaller batch?
- Cut recipe in half easily.
- → How long to bake?
- 45-55 minutes—watch the top.
- → Keep fresh?
- Fridge, 3 days max.
- → Good for kids?
- A sweet, fruity hit!