
 Pin it
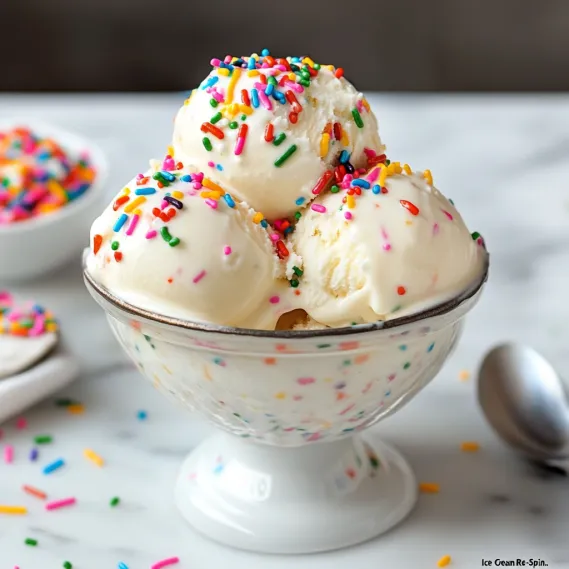
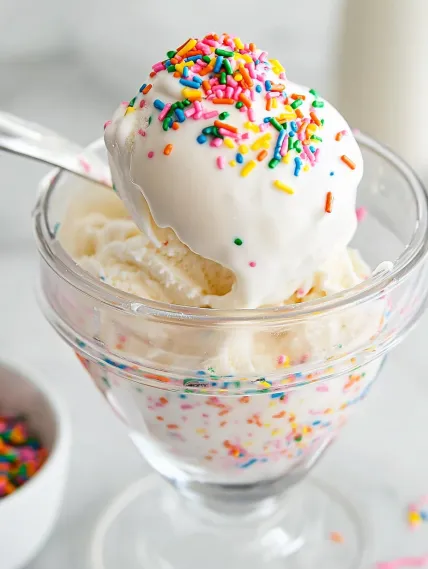
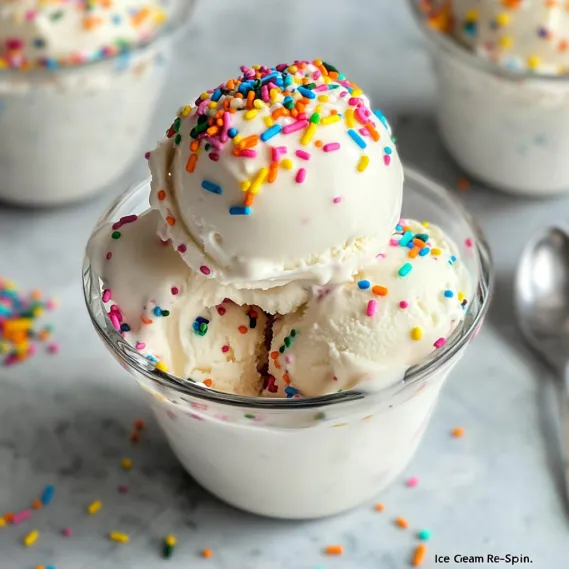
This vanilla-forward homemade Funfetti ice cream brings pure joy to dessert time with its creamy texture and colorful sprinkles scattered throughout. The Ninja Creami transforms simple ingredients into a silky smooth treat that rivals any premium store-bought version but with the satisfaction of making it yourself.
I first created this recipe when my daughter requested something "extra special" for her birthday. The moment she saw those rainbow sprinkles folded into creamy vanilla ice cream, her eyes lit up in a way that made this recipe an instant family tradition.
Ingredients
- Heavy cream: creates the luxurious mouthfeel essential for premium ice cream
- Whole milk: balances the richness while maintaining creaminess
- Granulated sugar: dissolves completely for a perfectly sweet base without grittiness
- Vanilla bean paste: offers genuine vanilla flavor with those beautiful specks throughout
- Salt: enhances all flavors and balances sweetness look for fine sea salt if possible
- Rainbow sprinkles: add the signature funfetti look choose jimmies over nonpareils for best texture
Step-by-Step Instructions
- Prep the Base:
- Whisk heavy cream, whole milk, sugar, vanilla bean paste, and salt in a medium bowl until completely combined. Take your time here ensuring sugar fully dissolves for the smoothest texture. The mixture should feel slightly thickened but still pourable, with no sugar granules when rubbed between your fingers.
- Freeze the Mixture:
- Transfer the liquid base into your Ninja Creami pint container, being careful not to exceed the max fill line. Secure the lid tightly and place it in the freezer on a completely level surface. This initial freezing requires patience allow at least 24 hours for the mixture to freeze solid, longer if your freezer runs warm.
- Spin to Perfection:
- Remove the frozen pint from the freezer and immediately install it into your Ninja Creami. Select the Ice Cream function and let the machine work its magic. Watch through the clear container as it transforms from solid to creamy in minutes. The first spin creates the base texture.
- Re-Spin If Needed:
- After the initial spin, assess the texture. If it appears crumbly or not quite smooth enough, create a small well in the center using a spoon, add 1/4 cup of cold milk, and select the Re-Spin function. This extra step produces that ideal soft serve consistency.
- Add Sprinkles and Serve:
- Once your ice cream reaches the perfect creamy texture, gently fold in a generous amount of rainbow sprinkles. Work quickly as the ice cream will begin to soften. Scoop into bowls, add additional sprinkles on top, and serve immediately for the ultimate funfetti experience.
 Pin it
The vanilla bean paste is truly the star ingredient here. I splurged on a high quality Madagascar vanilla paste after a disappointing batch with artificial vanilla, and the difference was remarkable. My son actually asked if I had "changed the recipe to make it taste like birthday cake" when I made the switch.
Storing Your Homemade Ice Cream
Proper storage ensures your Funfetti ice cream maintains its delightful texture. After serving, quickly return any leftovers to the original Creami container, press a piece of plastic wrap directly onto the surface of the ice cream to prevent ice crystals, then secure the lid. Store in the freezer for up to two weeks. When ready to enjoy again, you might need another quick re-spin to refresh the texture.
Ingredient Substitutions
While the original recipe creates that classic funfetti flavor, you can easily adapt it to dietary needs or preferences. For a lighter version, substitute half and half for the heavy cream. Lactose sensitive folks can use lactose free milk and cream with good results. The vanilla bean paste can be replaced with an equal amount of quality extract or a whole vanilla bean scraped. For a twist on the classic, try chocolate jimmies or holiday themed sprinkles to match any celebration.
 Pin it
Serving Suggestions
Transform this simple treat into a showstopping dessert with thoughtful presentation. Serve in waffle cones dipped in chocolate and more sprinkles for birthday parties. Create an ice cream sandwich using funfetti cookies for double the fun. For an elegant dinner party finale, scoop into martini glasses and garnish with a homemade vanilla cookie. My personal favorite is serving it alongside a warm slice of yellow cake for the ultimate birthday cake experience.
No Special Equipment Option
While the Ninja Creami produces exceptional results, this funfetti ice cream can still be made without specialty equipment. After preparing your base mixture, pour it into a shallow, freezer safe container. Freeze for 30 minutes, then remove and vigorously whisk to break up ice crystals. Return to freezer and repeat this process every 30 minutes for about 3 hours. Once the mixture begins to thicken substantially, fold in your sprinkles. The final texture will be slightly different but still delicious. Alternatively, you can use a traditional ice cream maker following the manufacturer directions.
Frequently Asked Questions
- → How do I make Funfetti Ice Cream in the Ninja Creami?
Whisk together heavy cream, whole milk, sugar, vanilla bean paste, and salt. Freeze the mixture for 24 hours in the Ninja Creami container, then process it in Ice Cream mode. Add sprinkles and enjoy!
- → What can I use if I don’t have a Ninja Creami?
Pour the prepared mixture into a freezer-safe container and freeze for 3-4 hours. Stir every 30 minutes to maintain a creamy texture, then serve with rainbow sprinkles for added fun.
- → Can I use different types of sprinkles?
Absolutely! Use any sprinkles you like, from classic rainbow sprinkles to themed or holiday-specific designs, for a personal touch.
- → How do I achieve the smoothest ice cream texture?
For the Ninja Creami, ensure you process the mixture on the correct mode and use the re-spin feature if needed. For the freezer method, stir frequently while freezing to avoid ice crystals.
- → Can I customize the flavor of the base?
Yes! You can replace or combine flavors like almond extract or cocoa powder with the vanilla bean paste for a unique taste. Experiment with your favorite flavors!