
 Pin it
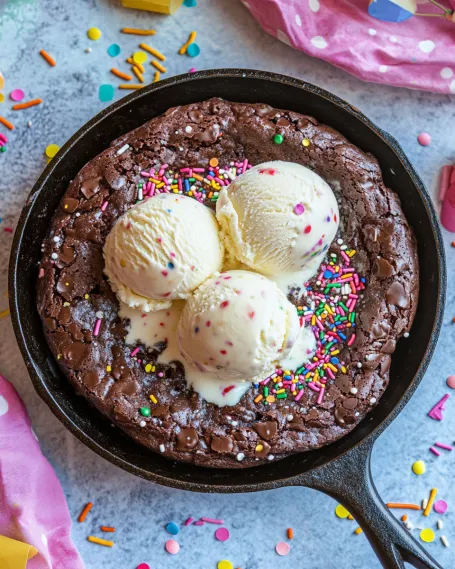
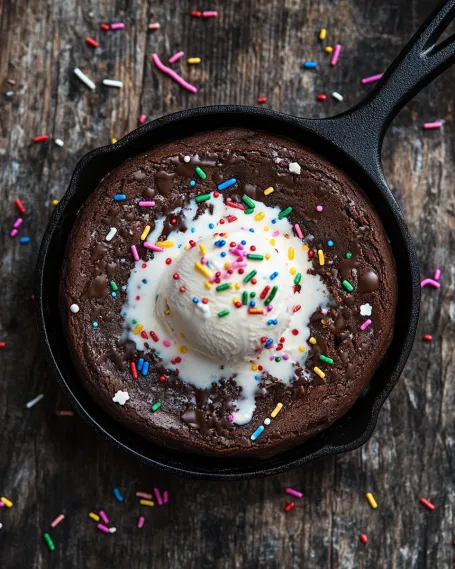
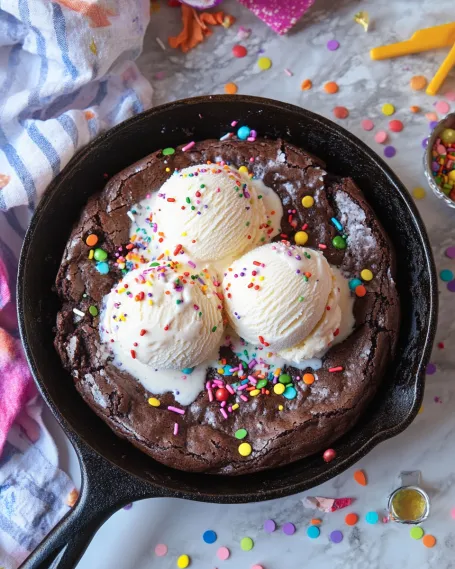
This decadent birthday brownie skillet transforms any ordinary day into a celebration worth remembering. With a fudgy brownie base studded with rainbow sprinkles and a hidden layer of melty Birthday Cake Lindor Truffles, it's the dessert equivalent of confetti cannons and party hats.
I first created this recipe during a particularly gloomy winter weekend when everyone needed cheering up. The moment I brought it to the table with candles flickering on top, my family's faces lit up brighter than the dessert itself. Now it's our go-to "emergency happiness" prescription.
Ingredients
- Box brownie mix: Plus ingredients called for on box gives you a reliable foundation without measuring dry ingredients
- Birthday Cake Lindor Truffles: Provide luxurious pockets of creamy white chocolate that melt into magical puddles
- Rainbow sprinkles: Add festive bursts of color and crunch throughout the brownie
- Vanilla ice cream: Creates the perfect temperature contrast to the warm brownie
- Chocolate syrup: Adds that final decadent drizzle that makes everything feel fancy
Step-by-Step Instructions
- Preheat the Oven:
- Set your oven to 350°F and generously coat a 9-inch cast iron skillet with baking spray. The cast iron creates those perfectly crispy edges that everyone fights over.
- Prepare the Batter:
- Mix the brownie batter according to package directions. This usually involves combining the dry mix with eggs, oil, and water until just incorporated. Avoid overmixing or you risk tough brownies. Gently fold in a half cup of rainbow sprinkles using a rubber spatula with just a few strokes.
- Layer the First Brownie Base:
- Spread half the colorful batter into your prepared skillet, making sure to create an even layer that reaches all the way to the edges. The first layer should be about half an inch thick.
- Add the Truffle Layer:
- Chop those beautiful Birthday Cake Lindor Truffles into quarters and scatter them evenly across the first layer of brownie batter. Keep them slightly away from the very edge for easier cutting later.
- Top with Remaining Batter:
- Spoon the remaining batter over the truffles in dollops, then gently spread with the back of a spoon. The top layer doesn't need to be perfectly smooth as it will level somewhat during baking.
- Bake to Perfection:
- Slide the skillet into your preheated oven and bake for 25 to 30 minutes. Look for crispy edges and a center that has set but still gives slightly when pressed. Remember that cast iron retains heat, so the brownie will continue cooking a bit after removal.
- Rest and Serve:
- Allow the brownie to cool for 5 to 10 minutes before serving. This brief rest helps the structure set up just enough so you can get clean scoops. Top with generous scoops of ice cream, a lavish drizzle of chocolate syrup, and an extra shower of sprinkles.
 Pin it
The Birthday Cake Lindor Truffles are truly the magical element in this recipe. I discovered their potential when my daughter unwrapped one and accidentally dropped it into brownie batter I was mixing. Rather than fish it out, I stirred it in, and that first accidental batch with melty truffle pockets became an immediate family legend.
Make-Ahead Magic
This brownie skillet can be prepared up to a day in advance if needed. Simply bake as directed, cool completely, and cover with foil. When ready to serve, reheat in a 300°F oven for about 10 minutes until warmed through. Add the ice cream and toppings just before serving for that fresh-baked experience.
 Pin it
Creative Variations
The beauty of this brownie skillet lies in its adaptability. For a mint chocolate version, substitute Mint Lindor Truffles and add a drop of mint extract to the batter. During fall, try Pumpkin Spice Lindor Truffles with a sprinkle of cinnamon in the batter. For chocolate lovers, use Double Chocolate brownies with Dark Chocolate Lindor Truffles for the ultimate chocolate experience.
Perfect Pairings
While this dessert stands gloriously on its own, consider serving it alongside glasses of cold milk for kids or paired with dessert wine for adults. Coffee or hot chocolate makes an excellent accompaniment during colder months. For extra indulgence, offer a small pitcher of warm caramel sauce alongside the chocolate for drizzling options.
Frequently Asked Questions
- → How do I prevent the skillet from sticking?
Make sure to coat your skillet generously with baking spray before spreading the brownie batter. This will ensure the dessert won’t stick when serving.
- → Can I use a different type of truffle or chocolate?
Absolutely! Substitute with any chocolate truffle or even chopped candies like white chocolate or caramel-filled chocolates for a unique twist.
- → Do I need to use a cast-iron skillet?
No, you can use any oven-safe skillet or even a round baking dish, but a cast-iron skillet gives the dessert slightly crispier edges.
- → How do I know when the skillet is done baking?
The edges should look crispy while the center remains slightly gooey. Test with a toothpick—it should come out with a few moist crumbs for the perfect texture.
- → Can I make this ahead of time?
Yes! You can bake the brownie skillet ahead of time and reheat in the oven or microwave before serving. Add the ice cream and toppings right before serving for the best experience.
- → Are there dairy-free alternatives for this dessert?
You can use a dairy-free brownie mix, dairy-free truffles or chocolate, and plant-based ice cream to make this skillet suitable for dairy-free diets.