
 Pin it
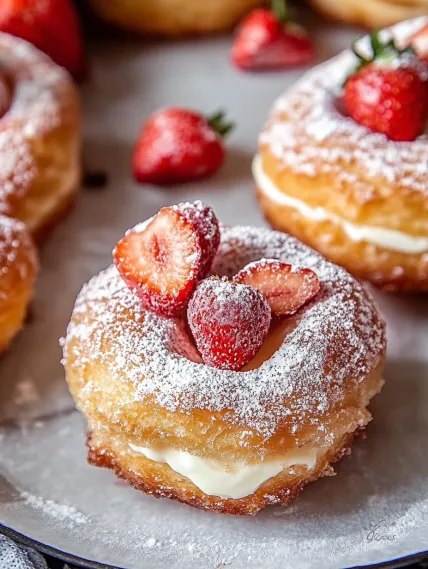
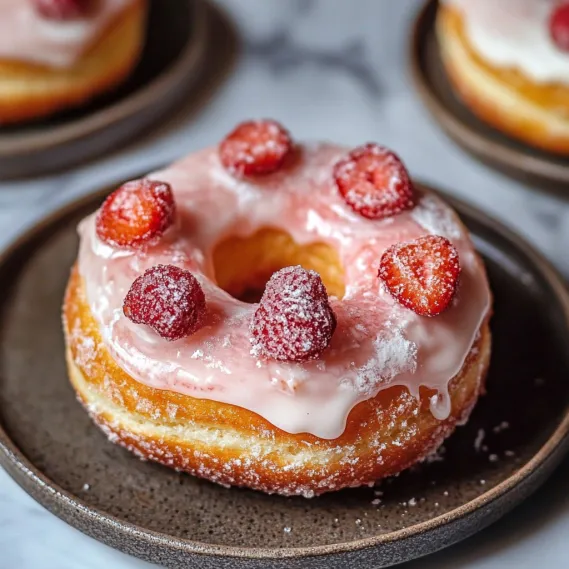
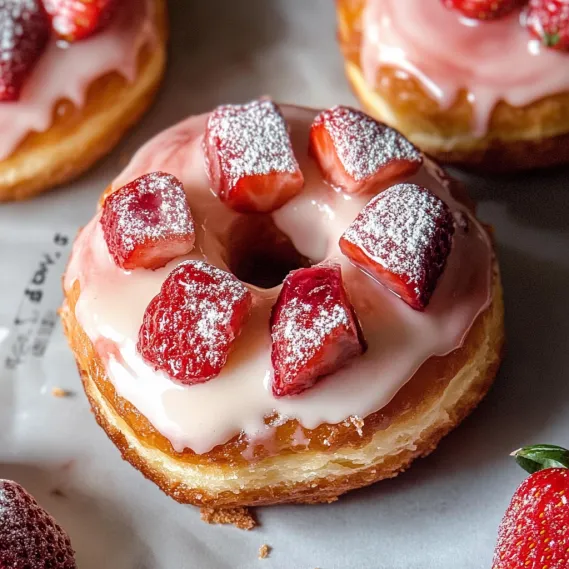
The Strawberry Vanilla Bean Cronuts delivers an extraordinary pastry experience combining the distinct qualities of two beloved classics. The flaky buttery layers reminiscent of fine croissants merge with the satisfying fried exterior of traditional donuts, creating something truly spectacular. Each bite reveals delicate laminated dough filled with luscious vanilla bean pastry cream and vibrant strawberry jam for the perfect balance of textures and flavors. This Dominique Ansel-inspired creation brings the famous New York City bakery experience directly to your home kitchen.
I first attempted these cronuts after returning from New York where standing in line for the original version became impossible during our short visit. While initially intimidated by the process, the results exceeded my expectations completely. My family now requests these for special celebrations, claiming they rival or even surpass bakery versions thanks to the fresh homemade components and careful attention to detail during preparation.
Essential Ingredients and Selection Tips
- Cronut Dough: Combines bread flour and all-purpose flour for optimal structure and tenderness. Select unbleached varieties for best flavor development.
- Butter Block: Creates the signature flaky layers through lamination. European-style butter with higher fat content produces superior results.
- Strawberry Jam: Provides bright fruity acidity that balances richness. Fresh seasonal berries deliver vibrant color and flavor intensity.
- Vanilla Bean Pastry Cream: Creates luxurious filling with authentic flavor. Genuine vanilla beans or paste rather than extract ensures visible specks and superior taste.
- Strawberry Sugar: Adds decorative finish and concentrated berry flavor. Use freeze-dried strawberries for most intense color and taste.
I've experimented with various butter brands for the lamination process, and found that splurging on imported European butter makes a noticeable difference in the final texture and flavor. The higher fat content creates more distinct layers and a richer taste that transforms these from good to exceptional.
Detailed Cooking Instructions
- Step 1: Beginning Foundation Dough
- Combine bread flour, all-purpose flour, instant yeast, egg whites, and water in stand mixer bowl. Mix with dough hook until ingredients fully incorporate. Continue kneading until dough becomes smooth and elastic, passing windowpane test when stretched thin.
- Step 2: Creating the Butter Block
- Place softened butter between two sheets of parchment paper, leaving plenty of space around edges. Gently pound and shape into an 8-inch square with even thickness throughout. Refrigerate until firm but still pliable for optimal lamination results.
- Step 3: Lamination Process
- Roll chilled dough into rectangle twice the size of butter block. Place butter block in center and fold corners over like envelope. Roll carefully in one direction creating long rectangle before performing first fold by bringing bottom third up and top third down.
- Step 4: Completing the Layers
- Wrap dough in plastic and refrigerate for one hour. Repeat rolling and folding process twice more with chilling periods between each turn. After final fold, refrigerate overnight, allowing gluten to relax and flavors to develop fully.
- Step 5: Forming and Frying
- Roll laminated dough to half-inch thickness on lightly floured surface. Cut circles using round cutters for cronuts and centers. Proof until visibly puffy, then fry in 350°F oil until golden brown on both sides, about 2-3 minutes per side.
- Step 6: Finishing Touches
- Transfer cronuts to baking sheets, spacing them 2 inches apart for proper air circulation. Brush tops with egg wash for golden color and sprinkle with granulated sugar or a mixture of granulated sugar and additional strawberry powder.
- Step 7: Baking to Perfection
- Bake in preheated oven at 375°F for 12-15 minutes until puffed and golden. Allow cronuts to cool for 5 minutes before transferring to wire rack to cool completely. This gradual cooling helps maintain their texture.
 Pin it
My favorite aspect of making these cronuts involves the dramatic transformation during frying when the carefully created layers expand dramatically, creating their distinctive appearance. My teenage son who typically shows minimal interest in baking always volunteers to help with this recipe, particularly enjoying the cutting process and watching the pastries puff in the hot oil. Our family tradition now includes making these for holiday breakfasts when we have multiple days available for the preparation process.
 Pin it
The Magic of Lamination
The true art of cronut-making lies in the lamination technique that creates those beautiful, distinct layers. When I first started making these, my layers would often disappear during frying, resulting in something closer to a regular donut. I learned that patience during the folding and chilling cycles is absolutely critical. Each time the dough rests in the refrigerator, the gluten relaxes while the butter firms up just enough to maintain separation between the layers. My breakthrough came when I started using a ruler to ensure even rolling and precise folds. Now when I slice into a finished cronut, I'm rewarded with that gorgeous honeycomb structure that signals perfect lamination.
Perfect Filling Balance
Finding the right balance between the vanilla bean pastry cream and strawberry jam took several attempts to perfect. Initially, I used too much jam, which overwhelmed the delicate vanilla notes and made the cronuts soggy within hours. Through trial and error, I discovered that piping a generous ring of vanilla bean pastry cream first creates a stable foundation, with just a small dollop of jam in the center. This approach highlights both flavors while maintaining the structural integrity.
Temperature Management Mastery
Maintaining proper temperature throughout the process transforms good cronuts into exceptional ones. During my early attempts, I worked in a warm kitchen and constantly fought melting butter that leaked during lamination. Now I keep a digital thermometer nearby to monitor both the dough and my workspace. I've found that chilling the rolling pin and work surface before each rolling session helps tremendously during summer months. For frying, I use a deep-fry thermometer and adjust the heat constantly to keep the oil between 345°F and 355°F. This narrow temperature range ensures the cronuts puff dramatically while cooking through perfectly without burning.
Seasonal Inspiration
While the strawberry-vanilla combination remains our family favorite, I've created seasonal variations that showcase the versatility of this technique. During autumn, I substitute apple butter and cinnamon pastry cream, rolling the finished cronuts in maple sugar. For Christmas morning, a chocolate pastry cream with peppermint-scented sugar creates a festive holiday treat. The spring version featuring lemon curd and blueberry jam has become particularly popular with friends, who request it for brunch gatherings when berries are at their peak.
Make-Ahead Magic
The versatility of this recipe extends to its preparation options, making it perfect for busy households. I've assembled them completely up to twelve hours before baking, storing them covered in the refrigerator until needed. For my son's basketball team gatherings, I prepare massive batches by freezing assembled unbaked cronuts individually on baking sheets before transferring them to freezer bags. This make-ahead approach means I can bake just the quantity needed, adding approximately five minutes to standard cooking time for perfectly fresh-tasting results without advance thawing.
Custom Flavor Adventures
While the classic strawberry-vanilla combination remains our family favorite, I've discovered endless possibilities through simple variations. For Sunday brunch, I substitute canadian bacon and swiss cheese, serving them with a maple-mustard dipping sauce that bridges breakfast and lunch beautifully. When hosting vegetarian friends, a filling of sautéed mushrooms, spinach and fontina cheese creates an equally satisfying experience. My most requested version for adult gatherings features prosciutto with mascarpone and fig jam, creating sophisticated bites that pair wonderfully with prosecco for casual entertaining.
Chef's Helpful Tips
- Pat pepperoni slices between paper towels before using to remove excess grease and prevent soggy rolls
- For extra flavor, mix 1 tablespoon of melted butter with 1 teaspoon of garlic powder and brush over rolls during the last 2 minutes of baking
- Create a dipping sauce bar with marinara, ranch, and garlic butter for maximum crowd-pleasing potential
- For sharper flavor, substitute half the mozzarella with sharp cheddar or pepper jack
- When making for children, tuck the pointy ends underneath before baking to create 'pillows' that are easier for little hands to hold
I learned the importance of letting the cronuts rest after my first attempt resulted in a slightly dry texture. Those extra minutes make all the difference in the final creaminess of the dish.
Budget-Friendly Meal Planning
This dish exemplifies smart cooking economics, creating an elegant protein option when chicken breasts or steaks are on sale. When cube steak goes on sale, I buy extra and freeze portions specifically for this recipe. The remaining ingredients are pantry staples with long shelf lives, making this recipe perfect for creating restaurant-quality meals at a fraction of takeout prices.
Family-Friendly Adaptations
For households with varying preferences, this recipe offers easy customization. Children who might resist certain vegetables will often enjoy this dish since the pasta takes on the savory mushroom flavor. Add grated cheese on top for picky eaters, or incorporate additional vegetables like peas or corn for more nutrition. The basic recipe serves as a foundation that can be adapted to please everyone at your table.
Seasonal Vegetable Additions
This versatile main dish welcomes seasonal produce throughout the year. Summer brings opportunities for fresh corn on the cob or zucchini. Fall calls for roasted butternut squash or mushrooms. Winter versions incorporate hearty root vegetables. Spring welcomes tender asparagus tips and fresh peas. These adaptations keep the meal interesting year-round while making use of what's fresh and affordable at your market.
Make-Ahead and Freezer Tips
For busy households, this recipe shines as a prepare-ahead solution. The pasta and sauce can be made up to three days in advance and refrigerated. For longer storage, the completely finished dish freezes beautifully for up to three months. When ready to cook, thaw overnight in the refrigerator before baking as directed, adding 1-2 minutes to the cooking time.
Chef's Essential Tips
- For extra flavor, add a teaspoon of dried thyme or rosemary to the mushroom mixture
- Toast the potato chips lightly before using for added crispiness
- Add a pinch of cayenne pepper to the mushroom mixture for a spicy kick
- For a thicker sauce, mix 1 tablespoon cornstarch with 2 tablespoons cold water and stir into the sauce during the last 5 minutes
- The dish keeps well for leftovers and tastes even better the next day
I discovered these refinements over many iterations of this dish - particularly the addition of rosemary, which adds remarkable depth to the flavor profile without being identifiable as rosemary.
This versatile tuna noodle casserole has become my reliable go-to when I need a satisfying meal that pleases everyone. The combination of tender pasta, creamy sauce, and crunchy potato chips creates something greater than the sum of its parts - a dish that feels indulgent while being surprisingly simple to prepare.
 Pin it
This tuna noodle casserole recipe proves that delicious, satisfying meals don't require complicated techniques or hard-to-find ingredients - just thoughtful preparation of quality basics that come together in harmony.
Frequently Asked Questions
- → Can I make the cronut dough ahead of time?
- Yes! The dough can be made up to the lamination stage and refrigerated for up to 3 days before cutting and frying. The longer rest actually improves flavor development.
- → Why do my cronuts need to be chilled before frying?
- Chilling helps firm up the butter layers, making the dough easier to handle and ensuring those beautiful flaky layers when fried. Don't skip this step!
- → What's the best oil for frying cronuts?
- Neutral oils with high smoke points work best. Canola, grapeseed, or vegetable oil are good choices. Maintain the oil temperature at 375°F for optimal results.
- → Can I bake these instead of frying?
- While traditional cronuts are fried, you can bake them at 400°F for about 15-20 minutes. They won't be identical to fried ones but still delicious.
- → How can I tell if my lamination was successful?
- When you cut the dough, you should see distinct layers of dough separated by thin butter layers. When fried, these layers will puff up and create the signature flaky texture.