
 Pin it
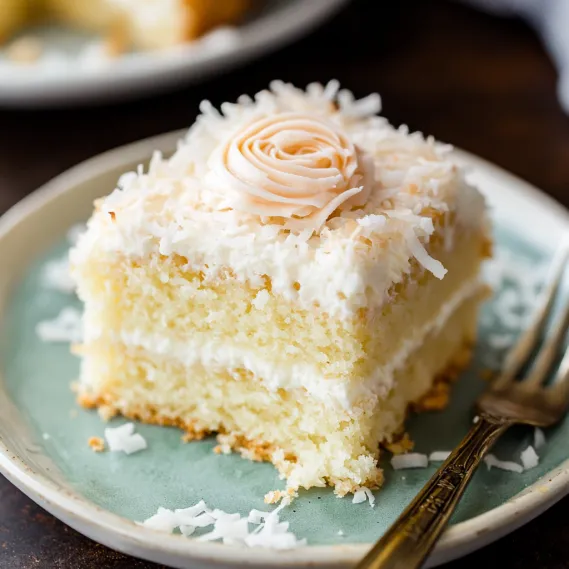
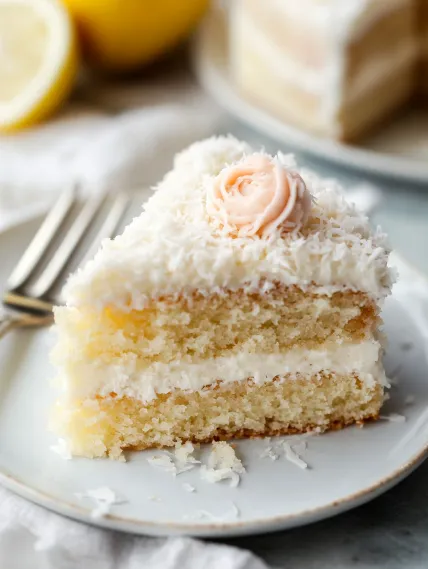
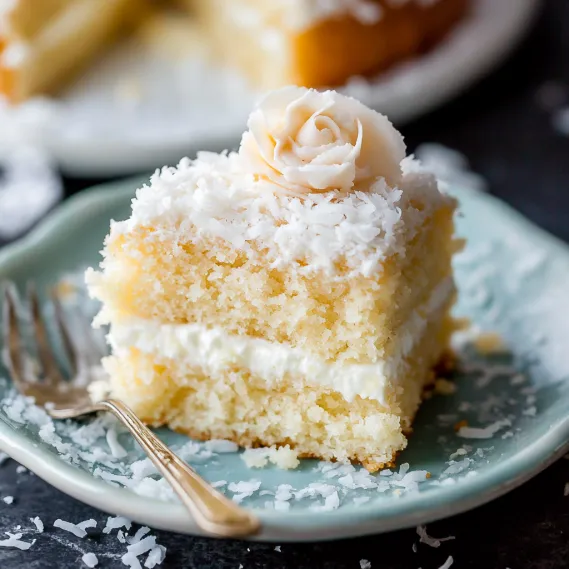
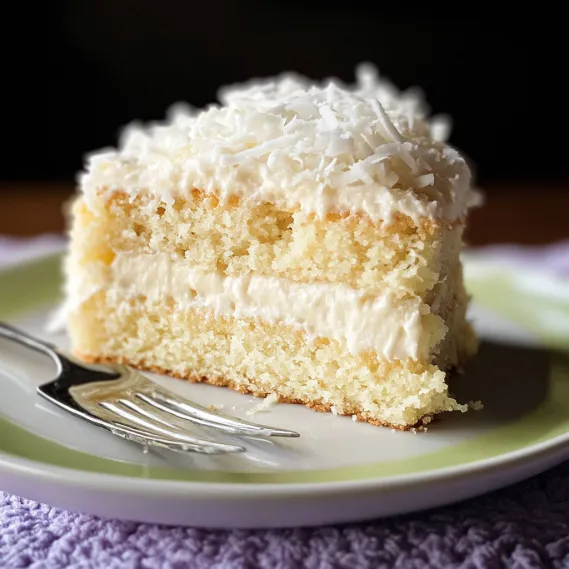
This exceptional coconut cake delivers triple coconut flavor in every pillowy bite – a supremely moist, cloud-like crumb infused with coconut milk, extract, and tender shreds of coconut. The silky coconut cream cheese buttercream complements the delicate cake layers perfectly, creating a dessert that's both impressive and irresistible. This recipe sets the standard for homemade cakes everywhere with its perfect balance of bold tropical flavor and light, fluffy texture. Whether for special occasions or whenever you're craving something truly spectacular, this coconut cake promises to exceed expectations.
I first served this cake at my mother's birthday celebration where even my uncle, who typically turns down dessert, requested a second slice! What surprised me most was how many non-coconut fans eagerly devoured it. The secret is the careful balance of ingredients that creates a cake with unmistakable coconut flavor without the sometimes overwhelming sweetness or tough texture found in lesser recipes.
Essential Ingredients and Selection Tips
- Cake Flour: Critical for the softest possible texture. Regular flour will make the cake dense and heavy.
- Egg Whites: Provide structure while keeping the crumb light and airy. Save the yolks for custard or ice cream.
- Sour Cream: Adds incredible moisture and tenderness to the cake. Full-fat works best.
- Coconut Milk: Use canned, full-fat coconut milk (not the beverage in cartons) for rich, authentic flavor.
- Coconut Extract: Intensifies the coconut flavor. Pure extract rather than imitation provides the best taste.
- Sweetened Shredded Coconut: Creates pockets of flavor and texture throughout the cake. Pulse in a food processor for smaller pieces.
I've discovered through extensive testing that the combination of sour cream and coconut milk creates the perfect moisture level that keeps this cake fresh for days. Many coconut cakes dry out quickly, but this one remains beautifully moist even on day three (if it lasts that long!).
Detailed Cooking Instructions
- Step 1: Prepare Your Equipment And Ingredients
- Preheat oven to 350°F. Grease and line three 9-inch cake pans with parchment paper. Bring all refrigerated ingredients to room temperature. In a food processor, pulse 2 cups sweetened shredded coconut until smaller pieces form, but not until powdery. Separate 5 large eggs, saving yolks for another use.
- Step 2: Create The Dry And Wet Mixtures
- In a large bowl, whisk together 3 cups cake flour, 1 tablespoon baking powder, and 1/2 teaspoon salt. In another bowl, beat 1/2 cup softened butter with 1 1/2 cups sugar until light and fluffy, about 4 minutes. Beat in 1 tablespoon coconut extract, then alternate adding the dry ingredients and a mixture of 1 cup canned coconut milk and 1/2 cup sour cream.
- Step 3: Incorporate The Egg Whites
- Beat 5 egg whites in a clean, oil-free bowl until stiff peaks form. Gently fold one-third of the egg whites into the batter to lighten it, then fold in remaining egg whites and 1 1/2 cups of the processed sweetened coconut until just combined. Divide batter evenly between prepared pans, smoothing tops with a spatula.
- Step 4: Master The Baking Process
- Bake for 21-23 minutes or until a toothpick inserted comes out with a few moist crumbs. Avoid overbaking, as this will dry out your cake. Cool in pans for 10 minutes, then turn out onto wire racks to cool completely. Ensure cakes are 100% cool before frosting to prevent melting and sliding layers.
- Step 5: Create Perfect Coconut Frosting
- Beat 8 oz softened cream cheese and 1/2 cup softened butter until smooth and creamy. Add 5 cups powdered sugar, 1/4 cup canned coconut milk, and 1/2 teaspoon coconut extract, beating until fluffy. Use to fill and frost the cooled cake layers, then press remaining shredded coconut onto the sides and top for decoration.
 Pin it
My first attempt at this cake was disappointing because I rushed and used cold ingredients. The batter curdled and the cake was uneven and dense. I've since learned that properly bringing ingredients to room temperature creates a smooth, uniform batter that bakes into the perfectly textured cake this recipe promises.
The Secret To Perfect Wok Technique
High heat is essential for authentic fried rice. My grandmother taught me to heat the wok until smoking before adding oil. Keep ingredients moving constantly to achieve that elusive "wok hei" flavor. Never overcrowd the pan—cook in batches instead. This technique transformed my fried rice into restaurant-quality perfection.
 Pin it
Making The Most Of Leftovers
This dish excels at transforming leftovers into something exciting. I've used roast chicken, holiday ham, and even Thanksgiving turkey with great success. Cut meat into uniform pieces that distribute evenly throughout. Leftover grilled steak adds incredible depth with its smoky edges. Even roasted vegetables bring delightful caramelized sweetness.
Balancing Flavors And Textures
Special fried rice succeeds through balanced components. Char siu provides richness, prawns add sweetness, eggs contribute silkiness, while vegetables offer freshness. The sequence matters—aromatics first build flavor, eggs midway remain distinct, vegetables maintain crispness. Adding spring onions last preserves their brightness for that authentic restaurant finish.
Customization For Dietary Needs
This dish adapts easily to dietary restrictions. For vegetarians, I omit meat, double eggs and add extra vegetables. Low-carb diners enjoy my cauliflower rice version that carries flavors beautifully. For gluten-sensitive guests, tamari replaces soy sauce while ensuring chicken powder is certified gluten-free. Everyone enjoys this beloved dish regardless of restrictions.
Creative Flavor Pairings
While this coconut cake is divine on its own, I've discovered several complementary flavor combinations that elevate it further. For tropical occasions, I fill the layers with fresh mango curd or pineapple preserves, transforming it into an island-inspired dessert. During berry season, I've layered it with fresh strawberries and a touch of lime zest in the frosting for a refreshing twist. My personal favorite variation incorporates a thin layer of bittersweet chocolate ganache between the cake layers, creating a sophisticated chocolate-coconut combination reminiscent of a gourmet candy bar. For wedding showers, I've added a splash of champagne to the frosting, which creates a subtly festive note that guests always notice but can't quite identify.
Expert Tips For Layer Cake Success
Building a beautiful layer cake requires attention to detail, but a few key techniques make the process much simpler. Always cool layers completely before assembling – even slight warmth will cause frosting to melt and layers to slide. For perfectly level cakes, I use a long serrated knife to trim any domed tops, creating flat surfaces that stack easily. When frosting, I apply a thin "crumb coat" first, chill the cake for 20 minutes, then apply the final layer of frosting for a professional finish. For the smoothest sides, I use a bench scraper held at a slight angle while slowly rotating the cake stand. Most importantly, I've learned not to rush – taking my time with each step results in a cake that's as beautiful as it is delicious.
Special Occasion Presentation Ideas
This coconut cake makes a stunning centerpiece for celebrations. For Easter gatherings, I decorate with pastel-colored macarons and edible flowers around the base. At bridal showers, I've topped it with a ring of fresh white roses or orchids for an elegant presentation. For birthday celebrations, I sometimes color a small portion of the coconut with food coloring and create an ombré effect from top to bottom. During the holidays, I add sugared cranberries and rosemary sprigs for a festive winter wonderland appearance. The simplest but most impressive decoration is toasting some of the coconut before pressing it onto the sides, creating beautiful color contrast that highlights the cake's homemade quality.
 Pin it
This coconut cake has become my signature dessert for a reason – it consistently impresses even those who claim not to like coconut. The combination of light, tender crumb and rich, tropical flavor creates a dessert experience that's worth every minute of preparation. Whether served at a casual family dinner or an elegant wedding reception, this cake never fails to elicit requests for the recipe and second helpings. While it may seem complex at first glance, following the steps carefully results in a showstopping dessert that will build your reputation as a masterful baker.
Frequently Asked Questions
- → Can I substitute all-purpose flour for the cake flour?
- While cake flour is strongly recommended for the best texture, you can make your own substitute if needed. For each cup of cake flour needed, measure 1 cup of all-purpose flour, remove 2 tablespoons, then add 2 tablespoons of cornstarch. Sift this mixture several times to ensure it's well combined and aerated. This DIY version won't be exactly the same as commercial cake flour, but it works in a pinch.
- → Why does this recipe use only egg whites and not whole eggs?
- Egg whites are key to the cake's fluffy texture. They provide structure without the heaviness that egg yolks add, resulting in a lighter crumb. Egg whites also help maintain the cake's pure white color, which provides a beautiful contrast with the coconut flakes. For best results, use fresh egg whites rather than carton egg whites, and separate them when cold for easier handling.
- → What's the difference between canned coconut milk and refrigerated coconut milk?
- Canned coconut milk is thick, rich, and has a high fat content, providing intense coconut flavor and moisture to the cake. It's made by pressing the flesh of mature coconuts and is usually found in the Asian food section. Refrigerated coconut milk beverage is thinner, more diluted, and typically contains additives to make it suitable as a drinking beverage. The canned version is essential for this recipe's flavor and texture.
- → My frosting seems too soft to work with. How can I fix it?
- Cream cheese frosting can sometimes be softer than traditional buttercream. If your frosting is too soft: 1) Add more confectioners' sugar, 1/4 cup at a time; 2) Refrigerate the frosting for 20-30 minutes to firm up before using; 3) Make sure both your butter and cream cheese weren't too warm when you started. Also, avoid overbeating the cream cheese as this can make the frosting too soft.
- → How do I get the coconut to stick to the sides of the cake without making a mess?
- Applying coconut to the sides of a cake can be tricky! Here's the easiest method: 1) Place your cake on a baking sheet to catch excess coconut; 2) Use one hand to gently press coconut into the sides while rotating the cake stand with your other hand; 3) Work in sections and apply coconut immediately after frosting each section while it's still tacky; 4) Use a clean, dry pastry brush to brush away excess coconut from the cake stand. The fallen coconut can be reused if it's clean.
- → Can this cake be made in advance for a special occasion?
- Yes! This cake is perfect for making ahead. You have several options: 1) Bake the cake layers up to a day ahead, cool completely, wrap tightly in plastic wrap and store at room temperature; 2) Make the frosting a day ahead, refrigerate, then bring to room temperature and beat briefly before using; 3) The fully frosted cake can be refrigerated for up to 5 days (though the coconut exterior will soften slightly); 4) Unfrosted cake layers or the completed cake can be frozen for 2-3 months - thaw overnight in the refrigerator and bring to room temperature before serving.