
 Pin it
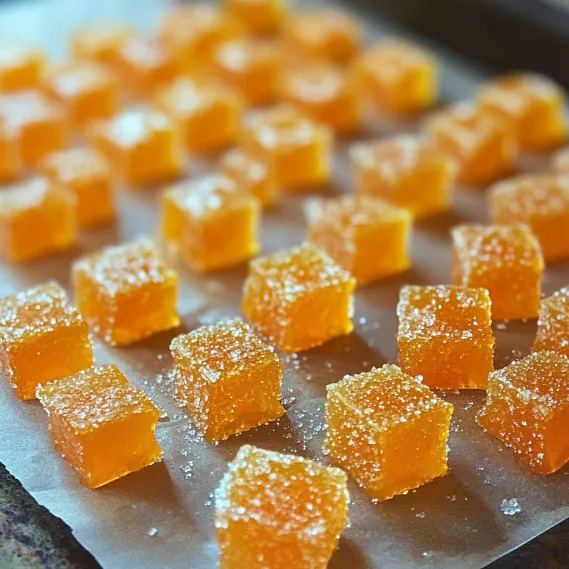
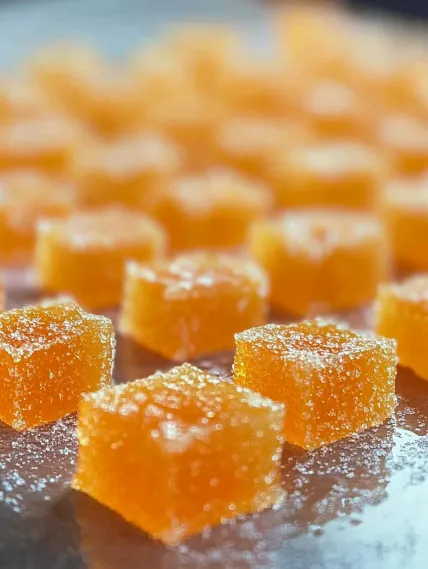
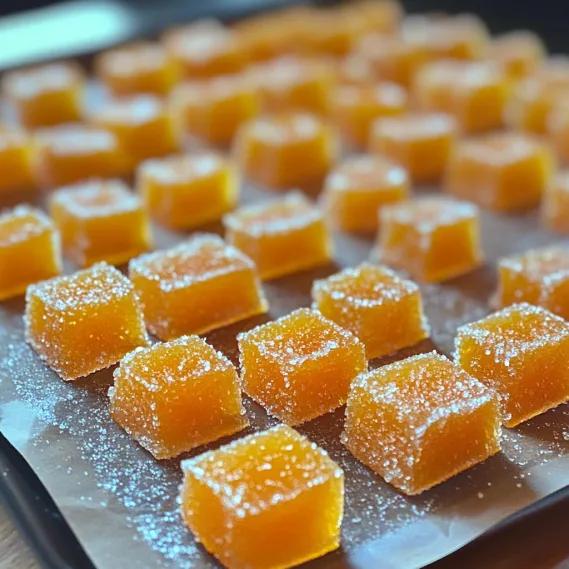
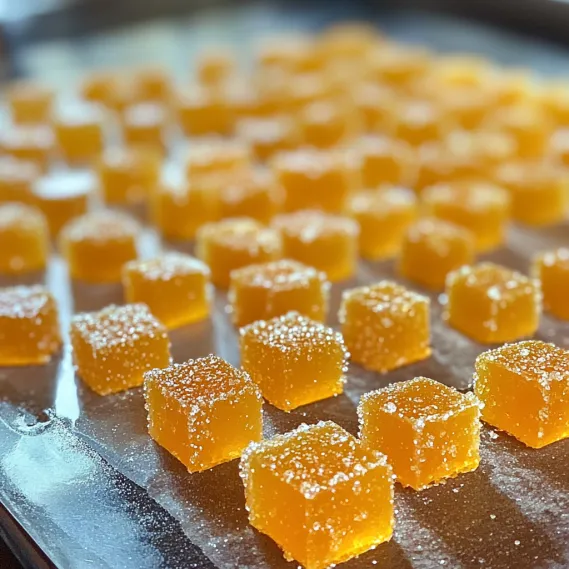
Recreate the magic of old-time candy shops with this simple but spectacular Old Fashioned Orange Candy. Each amber shard captures the essence of fresh citrus with bright, sunshine flavor in every bite. The translucent golden color with tiny flecks of zest catches the light beautifully, connecting us to generations of home candy makers.
Last winter, I made batches of this candy as holiday gifts. My Florida neighbor tasted a piece and closed her eyes with a smile, saying it transported her straight back to her childhood. There's something magical about how certain flavors can evoke powerful memories and create new ones around your table.
Essential Ingredients and Selection Tips
- Granulated Sugar: The foundation for sweetness and structure. Use pure cane sugar for best results.
- Light Corn Syrup: Prevents crystallization for glass-like texture. Lyle's Golden Syrup works as substitute.
- Fresh Orange Zest: Contains fragrant oils for authentic flavor. Use organic oranges if possible.
- Orange Extract: Enhances the citrus taste. Choose pure extract rather than artificial flavoring.
- Cream of Tartar: Prevents crystallization during cooking process.
Storing orange zest with sugar overnight intensifies flavor significantly. This extra step infuses sugar with essential oils that might otherwise evaporate during cooking. My family always notices when I take this extra time.
Detailed Cooking Instructions
- Step 1: Prepare Your Workspace
- Line a baking sheet with parchment paper and lightly coat with cooking spray. Set out all ingredients measured and ready, including a candy thermometer clipped to your saucepan. Open windows or turn on ventilation as the cooking process creates strong sugar aromas.
- Step 2: Capture the Orange Essence
- Wash and dry two large oranges, then zest using a Microplane grater, avoiding the bitter white pith. Gently press collected zest between paper towels to remove excess moisture, which could affect candy texture. The fragrant oils released give a preview of the wonderful aroma that will fill your kitchen.
- Step 3: Cook the Sugar Mixture
- Combine 2 cups sugar, 1/2 cup corn syrup, 1/2 cup water, and 1/4 teaspoon cream of tartar in a heavy-bottomed saucepan. Stir over medium heat until sugar completely dissolves and mixture looks clear rather than grainy. Once dissolved, stop stirring to prevent crystallization and swirl the pan occasionally to distribute heat.
- Step 4: Monitor the Temperature
- Increase heat to medium-high and allow mixture to boil undisturbed until reaching 300-310°F (hard-crack stage), typically 7-10 minutes. Watch closely as temperature approaches target – bubbles become smaller and more stable, and syrup shifts from clear to light amber. This critical temperature ensures perfect texture – hard and glass-like rather than sticky.
- Step 5: Add Flavors and Pour
- Once at temperature, immediately remove from heat and work quickly but carefully. Stir in 1/4 cup prepared orange zest, 2 teaspoons pure orange extract, and optional orange food coloring (mixture will bubble vigorously). Quickly pour onto prepared baking sheet without scraping the pot, allowing it to spread naturally or guiding with a lightly oiled spatula.
- Step 6: Final Seasoning
- Let the candy rest for 10 minutes before slicing to prevent the flavorful juices from leaking out. The candy will look slightly underdone but will harden perfectly as it cools. Sprinkle with a small pinch of salt to enhance orange flavor without tasting salty.
 Pin it
I learned temperature precision the hard way during my first attempt. The result was sticky taffy instead of hard candy. Now I use both visual cues and a reliable thermometer for perfect results. My daughter watches eagerly for the magical moment when we reach hard-crack stage.
The Science behind Perfect Candy
At 300°F-310°F, enough water evaporates to create a supersaturated mixture forming glass-like texture when cooled. Even slight temperature variations dramatically change results. Visual cues include smaller bubbles and amber color shift, but thermometers remain essential for consistency. My guests are always impressed by the precision in something seemingly so simple.
 Pin it
Creative Flavor Variations
Classic orange brings nostalgia, but variations have become family favorites. Try lemon or lime zest for summer, add ginger for warmth in winter, or incorporate rosemary for sophisticated notes with after-dinner coffee. Holiday gatherings call for cinnamon and clove, reminiscent of mulled cider. Each adaptation maintains the basic technique while creating entirely different flavor experiences.
Gifting and Presentation Ideas
The amber color and unique shape makes this candy especially gift-worthy. Layer pieces in small tins with orange ribbon, place single shards as dessert plate garnishes, or serve in vintage candy dishes for tea. My most dramatic presentation involves dipping one edge in tempered dark chocolate, creating stunning contrast and adding another flavor dimension.
Troubleshooting Common Issues
For cloudy candy, avoid sugar crystal contamination and stirring after boiling begins. When candy won't harden, your temperature was likely too low—verify thermometer accuracy in boiling water (212°F at sea level). If bitter, you overcooked—always remove from heat at exactly 310°F. Addressing these issues has made me the designated 'candy maker' among friends.
Chef's Helpful Tips
- Line pans with non-stick foil instead of parchment for easiest release
- Pour hot candy into oiled cookie cutters for perfectly controlled shapes
- Add 1/2 teaspoon vanilla extract alongside orange for depth
- Use food-grade desiccant packets to prevent humidity-induced stickiness
- Crush leftover pieces for beautiful cocktail or dessert garnishes
 Pin it
Making orange candy has become a cherished home ritual. Transforming pantry staples into jewel-like shards that capture sunshine brings deep satisfaction. The process requires care, but rewards with authentic flavor that commercial candies can't match. I hope this recipe travels with my children to their own kitchens, carrying forward flavor memories and handmade joy.
Frequently Asked Questions
- → Do I need a candy thermometer to make this recipe?
- While a candy thermometer is highly recommended for accuracy, you can use the cold water test if you don't have one. Drop a small amount of the syrup into cold water - it should form hard, brittle threads that snap easily when bent (hard crack stage).
- → Why did my candy turn cloudy instead of clear?
- Cloudiness usually happens when sugar crystals form during cooling. To prevent this, avoid stirring after the sugar dissolves, wash down any sugar crystals on the sides of the pan with a wet pastry brush, and don't scrape the pan when pouring the hot syrup.
- → Can I use other citrus flavors instead of orange?
- Absolutely! This recipe works beautifully with lemon, lime, or grapefruit zest and their corresponding extracts. You can adjust the food coloring to match the fruit you're using.
- → How long will the candy stay fresh?
- When stored in an airtight container in a cool, dry place, the candy will stay fresh for up to 2 months. For longer storage, separate layers with wax paper to prevent sticking.
- → What should I do if my candy is too sticky?
- If your candy turns out sticky, it likely didn't reach a high enough temperature. You can fix slightly sticky candy by dusting it with a thin layer of powdered sugar or cornstarch before storing.