
 Pin it
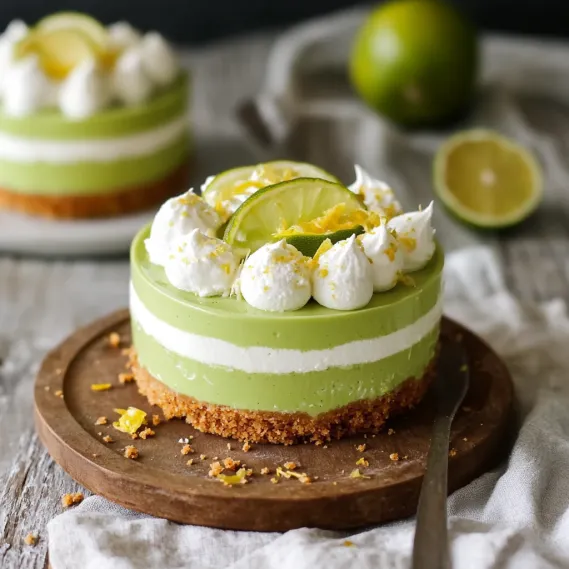
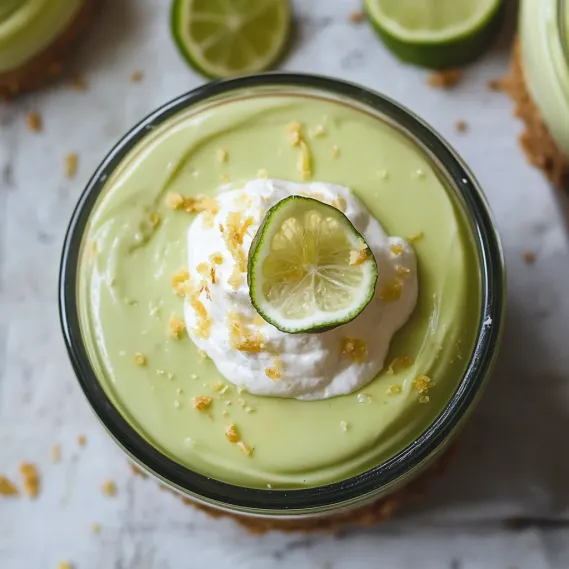
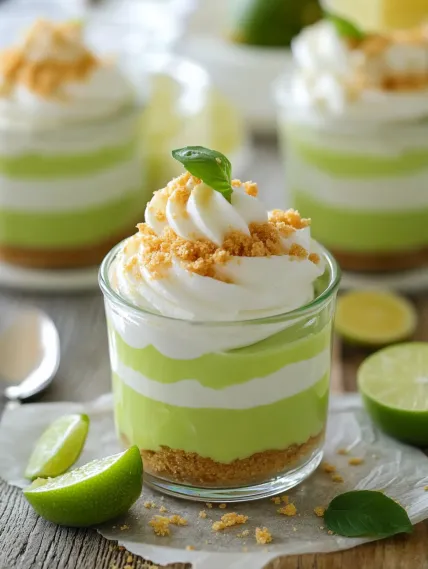
This refreshing No-bake Key Lime Cheesecake in individual jars brings the perfect balance of tangy and sweet flavors without turning on your oven. The creamy, zesty filling pairs beautifully with the buttery graham cracker crust for a dessert that looks as impressive as it tastes.
I created these jars for my daughter's graduation party last summer when the temperatures soared above 90 degrees. The last thing I wanted was to heat up the kitchen with the oven but still needed an impressive dessert. These vanished within minutes with guests asking for the recipe before they even left.
Ingredients
- Graham crackers: Creates the perfect crunchy base texture look for honey graham varieties for best flavor
- Butter: Binds the crust together use unsalted for a cleaner taste
- Cream cheese: Provides the rich cheesecake foundation choose full fat for the creamiest result
- Powdered sugar: Dissolves perfectly without graininess regular granulated sugar would make the filling grainy
- Key lime juice: Delivers the signature tangy flavor bottled works but fresh juice offers brighter flavor
- Vanilla extract: Balances the acidity use pure not imitation for best results
- Whipped topping: Creates lightness and airiness you can substitute homemade whipped cream if preferred
- Lime slices and zest for garnish: Adds visual appeal and intensifies the lime flavor
How To Make No-bake Key Lime Cheesecake Jars
- Prepare the crust:
- Combine crushed graham crackers and melted butter until the mixture resembles wet sand. Test it by pinching some between your fingers. It should hold together but not be overly greasy. Divide evenly among your jars pressing firmly with the back of a spoon to create a compact layer.
- Whip the cream cheese:
- Beat softened cream cheese until completely smooth with no lumps whatsoever. This is crucial for a silky texture so spend at least 2 minutes beating even if it looks smooth earlier. The cream cheese must be fully room temperature or you will end up with lumps.
- Add the flavorings:
- Gradually incorporate powdered sugar, key lime juice, and vanilla extract while continuing to mix at medium speed. Stop occasionally to scrape down the sides of the bowl ensuring everything is thoroughly combined. The mixture will become slightly looser as the lime juice incorporates.
- Fold in whipped topping:
- Using a rubber spatula gently fold the whipped topping into the cream cheese mixture with a figure eight motion. Work slowly to maintain as much air as possible for a light fluffy texture. Continue until no white streaks remain but avoid overmixing.
- Assemble the jars:
- Spoon or pipe the cheesecake mixture over each graham cracker base. For a professional look use a piping bag with a large round tip. Leave a small space at the top of each jar if adding garnishes. Tap jars gently to settle the filling and eliminate air pockets.
- Chill thoroughly:
- Refrigerate jars for at least 2 hours but preferably overnight. The flavors develop and meld together during this time resulting in a more pronounced lime flavor and allowing the filling to set properly.
 Pin it
The key lime juice is truly the star ingredient here. I once made this with regular Persian limes when key limes were unavailable, and while still delicious, it lacked that distinctive tangy brightness that makes this dessert special. My husband now makes a special trip to our farmers market just for key limes whenever I mention making these jars.
Make Ahead Instructions
These cheesecake jars are perfect for planning ahead. You can prepare them up to two days before serving with excellent results. In fact, the flavor improves after about 24 hours in the refrigerator as the lime mellows slightly and infuses throughout the filling. If making more than two days ahead, consider waiting to add any fresh garnishes until just before serving for the freshest appearance.
Ingredient Substitutions
If key limes are unavailable, you can substitute regular Persian limes, though the flavor will be slightly less tangy and complex. For a dairy-free version, use plant-based cream cheese and coconut cream whipped until fluffy instead of the whipped topping. Those seeking a gluten-free dessert can easily swap traditional graham crackers for gluten-free graham crackers or even crushed gluten-free gingersnaps for an interesting flavor variation.
 Pin it
Serving Suggestions
These charming cheesecake jars make a stunning dessert display when arranged on a tiered stand or tray with fresh lime slices. For a complete dessert table, pair them with other citrus-themed treats like lemon bars or orange shortbread. They also complement a summer barbecue menu perfectly, offering a refreshing finale after grilled foods. Consider serving with a small sprig of fresh mint for an extra pop of color and complementary flavor.
Storage Tips
Store these cheesecake jars in the refrigerator with lids tightly sealed to prevent them from absorbing other food odors. They will maintain their best quality for up to 3 days. While you can freeze these jars for up to 1 month, the texture of the filling may become slightly less creamy upon thawing. If freezing, thaw overnight in the refrigerator before serving rather than at room temperature for the best results.
Frequently Asked Questions
- → What can I substitute for key lime juice?
If key limes aren’t available, you can use regular lime juice or even a mix of lemon and lime juice for a similar tart flavor.
- → Can I make these jars ahead of time?
Yes, these jars can be made a day in advance. Simply store them in the refrigerator to keep them fresh.
- → How do I get a stronger lime flavor?
For a more intense lime flavor, consider adding extra lime zest to the cheesecake mixture.
- → Can I use a different crust for the base?
Absolutely! You can substitute the graham cracker crust with cookie crumbs, such as digestive biscuits or shortbread, for a different texture and flavor.
- → How long should the jars chill before serving?
The jars should chill in the refrigerator for at least 2 hours to allow the flavors to meld and for the cheesecake mixture to set.
- → Can I make this dairy-free?
Yes, you can use dairy-free alternatives for cream cheese and whipped topping to make this dessert suitable for a dairy-free diet.