
 Pin it
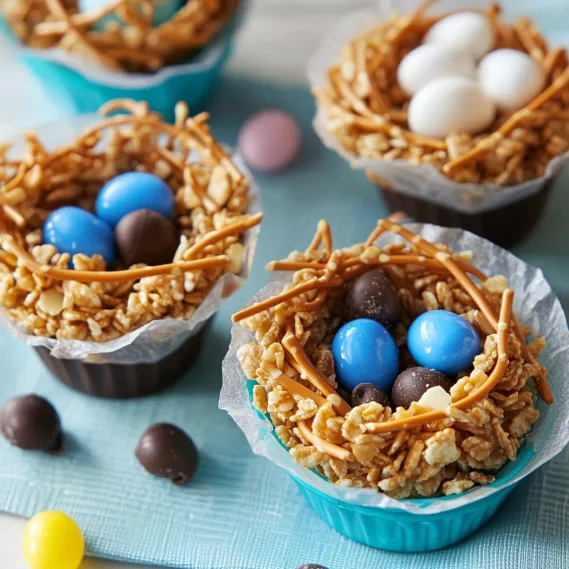
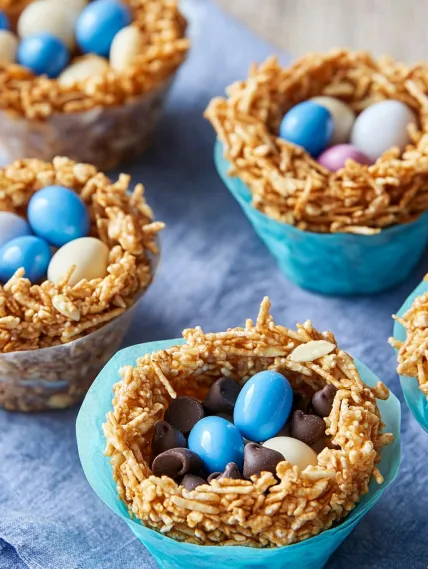
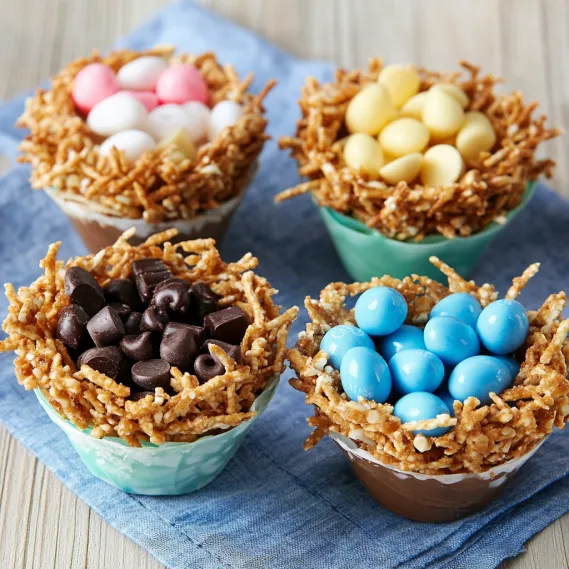
These adorable edible Easter nests transform simple pantry ingredients into charming springtime treats that capture the magic of the season. Melted chocolate or butterscotch chips form the perfect binding agent for cereal, pretzels, coconut, or nuts, creating delicate nests ready to cradle colorful candy eggs. The versatility of this recipe allows for endless customization, whether you prefer the rustic look of shredded wheat, the salty-sweet combination of pretzels with chocolate, or the tropical touch of coconut. These festive creations make perfect individual desserts, place settings for Easter dinner, or sweet additions to Easter baskets.
I first made these nests for my daughter's spring-themed birthday party, and they were such a hit that they've become our Easter tradition. What I love most is how something so simple creates such delight – the children's faces light up when they see these little nests, and even adults can't resist their charm. The best part? They're completely customizable based on your family's favorite ingredients and the colors you want to feature on your Easter table.
Essential Ingredients and Selection Tips
- Chocolate or Butterscotch Chips: High-quality chips melt more smoothly; choose dark, milk, white chocolate, or butterscotch based on your preference.
- Shredded Wheat Cereal: Creates the most nest-like appearance; crush into small pieces but not powder.
- Pretzels: Mini pretzel sticks work best; break in half for easier mixing and shaping.
- Crispy Rice Cereal: Provides great texture and easily takes the shape of nests.
- Coconut Flakes: Toast lightly for enhanced flavor and a more realistic nest appearance.
I've found that using a combination of mix-ins creates the most interesting texture. My personal favorite is the butterscotch version with a mixture of shredded wheat and sliced almonds – the nuts add extra protein and a pleasant crunch that balances the sweetness perfectly.
Detailed Cooking Instructions
- Step 1: Prepare Your Workspace
- Line a 6-cup muffin tin with plastic wrap, pressing it into each cavity and leaving overhang for easy removal. Have all your ingredients measured and ready before melting the chips, as the chocolate will begin to set quickly once removed from heat.
- Step 2: Create The Perfect Binding Base
- Place 1 cup of your chosen chips (dark chocolate, milk chocolate, white chocolate, or butterscotch) in a microwave-safe bowl. Heat in 30-second intervals at 50% power, stirring between each interval until just melted. Be careful not to overheat, as this can cause the chocolate to seize or become grainy.
- Step 3: Combine With Your Chosen Mix-ins
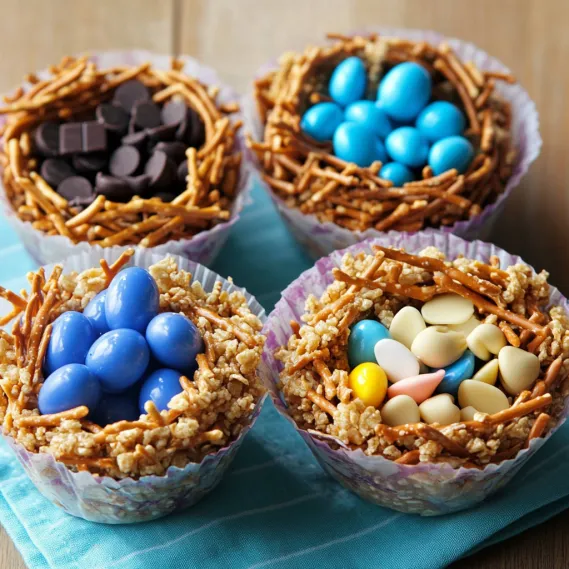
- Working quickly, fold in your dry ingredients (1½ to 2½ cups depending on which version you're making). For butterscotch nests, mix in ¾ cup crushed shredded wheat and ¾ cup sliced almonds. For chocolate pretzel nests, stir in 2½ cups broken pretzel sticks. For cereal nests, incorporate 1½ cups crispy rice cereal. For coconut nests, fold in 1½ cups toasted coconut flakes.
- Step 4: Shape Into Perfect Nests
- Divide the mixture evenly among the prepared muffin cups. Using the back of a spoon or your fingers, press the mixture against the sides of each cup and create a depression in the center to form nest shapes. Work quickly before the chocolate sets completely.
- Step 5: Set And Decorate
- Place the muffin tin in the refrigerator until the nests are completely set, about 10 minutes. Gently remove by lifting the plastic wrap overhang. Fill each nest with blue jelly beans, chocolate eggs, or other Easter candies that resemble eggs. For the most realistic presentation, use 2-3 small candy eggs per nest.
 Pin it
I learned through trial and error that the key to perfect nests is finding the right ratio of chocolate to dry ingredients. Too much chocolate makes them too flat and solid; too little and they won't hold together. The measurements provided strike the perfect balance, but don't be afraid to adjust slightly based on your specific ingredients.
The Secret To Perfect Wok Technique
High heat is essential for authentic fried rice. My grandmother taught me to heat the wok until smoking before adding oil. Keep ingredients moving constantly to achieve that elusive "wok hei" flavor. Never overcrowd the pan—cook in batches instead. This technique transformed my fried rice into restaurant-quality perfection.
 Pin it
Making The Most Of Leftovers
This dish excels at transforming leftovers into something exciting. I've used roast chicken, holiday ham, and even Thanksgiving turkey with great success. Cut meat into uniform pieces that distribute evenly throughout. Leftover grilled steak adds incredible depth with its smoky edges. Even roasted vegetables bring delightful caramelized sweetness.
Balancing Flavors And Textures
Special fried rice succeeds through balanced components. Char siu provides richness, prawns add sweetness, eggs contribute silkiness, while vegetables offer freshness. The sequence matters—aromatics first build flavor, eggs midway remain distinct, vegetables maintain crispness. Adding spring onions last preserves their brightness for that authentic restaurant finish.
Customization For Dietary Needs
This dish adapts easily to dietary restrictions. For vegetarians, I omit meat, double eggs and add extra vegetables. Low-carb diners enjoy my cauliflower rice version that carries flavors beautifully. For gluten-sensitive guests, tamari replaces soy sauce while ensuring chicken powder is certified gluten-free. Everyone enjoys this beloved dish regardless of restrictions.
Creative Variations For Every Taste
Beyond the four basic recipes, I've developed several creative variations that have become family favorites. For a grown-up version, add a teaspoon of orange zest to the white chocolate before melting, then mix with toasted coconut and chopped dried apricots. For a healthier option, use dark chocolate with a mixture of crushed whole grain cereal and chopped dried fruits. During Christmas, we adapt this recipe by using green-tinted coconut with red candy berries instead of eggs. My children's current favorite is a s'mores version—milk chocolate mixed with golden graham cereal pieces and mini marshmallows, with chocolate eggs nestled inside. The possibilities are endless once you master the basic technique.
Making It A Family Activity
These nests are the perfect project to involve children of all ages in Easter preparations. I set up an assembly line where my youngest helps measure ingredients, my middle child assists with mixing, and my oldest handles the shaping. We each get to create our own variation, making it a fun competition to see whose nests look most realistic. Not only does this create a meaningful family activity, but it also builds confidence in the kitchen for little ones. The pride on their faces when they present their creations to guests is worth any extra mess this project might create!
Perfect Pairings And Presentations
While these nests are delightful on their own, I've found several ways to incorporate them into larger Easter celebrations. For Easter brunch, I place one at each place setting with a name card tucked inside. For dessert, I arrange them on a bed of green-tinted coconut "grass" on a large platter, surrounded by additional Easter candies and spring flowers. They make adorable toppers for cupcakes—simply place a smaller version on top of buttercream frosting. For Easter baskets, I wrap individual nests in clear cellophane tied with pastel ribbon. One year, I even created a giant nest centerpiece using a large bowl as a mold and the same technique scaled up.
 Pin it
These Easter Nest Eggs have become more than just a sweet treat in our family—they're a cherished part of our holiday tradition that marks the arrival of spring. Simple enough for everyday baking but special enough for celebrations, they represent what I love most about holiday food: creating joy through creativity without unnecessary complexity. Whether you're making them for a classroom party, family gathering, or just to celebrate the season, these nests bring a touch of whimsy and a whole lot of smiles to Easter festivities.
Frequently Asked Questions
- → Can I make these nests ahead of time?
- Yes! These nests can be made up to two weeks ahead of time. Store them in an airtight container at room temperature for up to 5 days, or in the refrigerator for up to 2 weeks. For best results, add the candy fillings just before serving or gifting to prevent any color transfer or softening of the nests. If storing in layers, place parchment paper between layers to prevent sticking.
- → What's the best way to melt chocolate chips without burning them?
- The key to melting chocolate chips without burning is to use low heat and short intervals. In the microwave, heat at 50% power in 30-second intervals, stirring well between each interval until completely smooth. Alternatively, you can use a double boiler method: place the chips in a heat-proof bowl set over a pot of barely simmering water (ensuring the bottom of the bowl doesn't touch the water), and stir until melted. Stop heating as soon as most chips are melted - the residual heat will melt the rest while stirring.
- → Can I use different cereals or mix-ins for these nests?
- Absolutely! Feel free to experiment with different cereals and mix-ins based on what you have on hand. Good alternatives include crushed corn flakes, granola, chopped dried fruits, or even crushed graham crackers. The key is to maintain a good ratio of dry ingredients to melted chips - approximately 1½ to 2½ cups of dry ingredients to 1 cup of chips, depending on how absorbent your dry ingredients are.
- → Why won't my nests hold their shape?
- If your nests aren't holding their shape, there could be a few issues: 1) The ratio of dry ingredients to melted chips may be off - try adding a bit more dry ingredients; 2) The chocolate might not have cooled enough before shaping - let it cool slightly after mixing in dry ingredients; 3) You might need more time in the refrigerator - some varieties may need 15-20 minutes to fully set, especially in warm kitchens; 4) Press firmly when shaping to ensure the ingredients bind together well.
- → How do I toast coconut for the coconut nests?
- To toast coconut, spread the flakes in a thin, even layer on a baking sheet. Bake at 325°F (165°C) for 5-10 minutes, stirring every 2-3 minutes for even browning. Watch it closely as coconut can go from perfectly toasted to burnt very quickly! You'll know it's done when most flakes are a light golden brown. Let it cool completely before mixing with melted chocolate. Alternatively, you can toast coconut in a dry skillet over medium-low heat, stirring constantly until golden.
- → What are some alternative fillings for these nests?
- Beyond the traditional jelly beans and chocolate eggs, consider these filling alternatives: pastel-colored candies like M&Ms or Smarties; small marshmallows (regular or flavored); colorful Jordan almonds; marzipan shaped into tiny eggs or chicks; small chocolate truffles; yogurt-covered raisins; or even savory options like chocolate-covered nuts for adult palates. You can also match fillings to nest flavors - butterscotch chips in butterscotch nests or white chocolate pearls in coconut nests.