
 Pin it
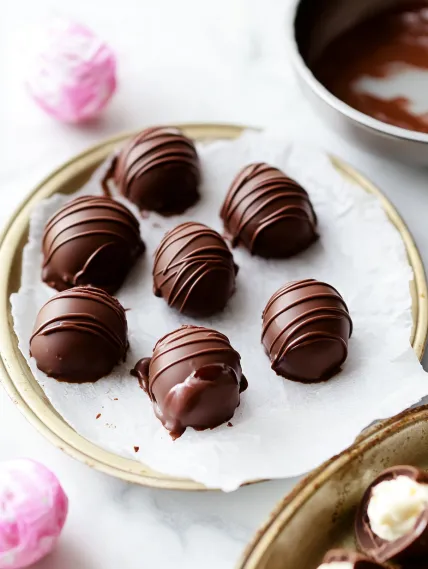
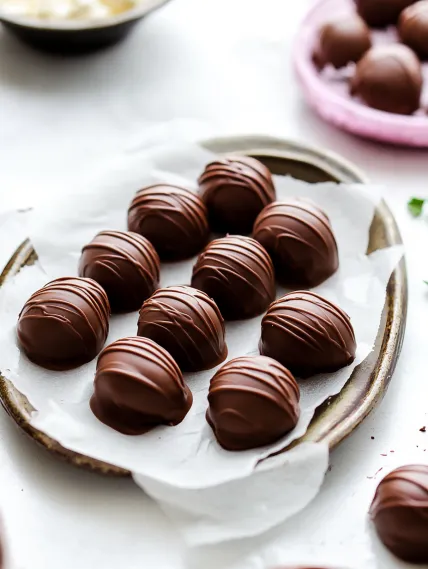
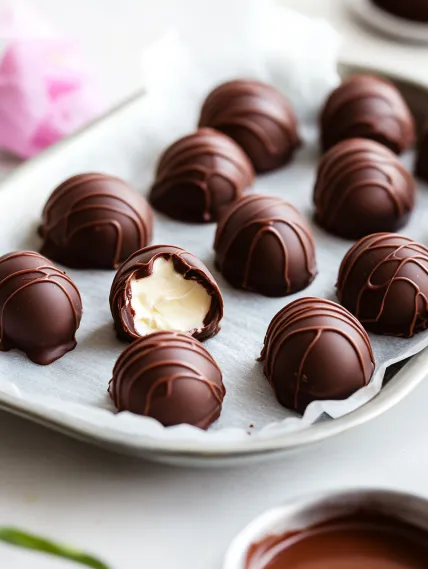
These homemade Easter egg buttercream candies deliver pure indulgence in every bite – a lusciously creamy vanilla-almond buttercream center enrobed in rich, dark chocolate. The contrast between the sweet, melt-in-your-mouth filling and the slightly bitter chocolate creates an irresistible combination that rivals any store-bought candy. Easily customizable with various flavors and made from simple pantry ingredients, these impressive treats make perfect Easter basket additions or elegant after-dinner sweets. The process requires minimal equipment and results in professional-looking candies that friends and family will rave about.
I first made these for our neighborhood Easter egg hunt, where adults lingered by the refreshment table instead of supervising their children! What surprised me most was how many people asked for the recipe, assuming these treats required special equipment or professional skills. The secret is properly chilling the filling before shaping and dipping – a simple step that ensures perfect results every time.
Essential Ingredients and Selection Tips
- Butter: Use unsalted butter at room temperature (let sit for 1 hour). The proper consistency is crucial – soft enough to mix but still cool to the touch, not melted or overly soft.
- Confectioners' Sugar: Creates the sweet base and proper consistency. Sift it if lumpy for the smoothest filling.
- Heavy Cream: Adds richness and creaminess. Half-and-half works in a pinch, but heavy cream produces the best texture.
- Extracts: Vanilla provides the base flavor, while almond adds sophisticated depth. Use pure extracts rather than imitation for the best flavor.
- Chocolate: Use real baking chocolate bars (not chips) for proper melting. Ghirardelli or Baker's brands in semi-sweet or bittersweet varieties work beautifully.
I've discovered through trial and error that the quality of your chocolate makes a significant difference in the final product. Splurging on good chocolate elevates these candies from delicious homemade treats to something that tastes genuinely gourmet.
Detailed Cooking Instructions
- Step 1: Prepare Your Buttercream Base
- Beat 6 tablespoons room temperature unsalted butter until smooth and creamy, about 2 minutes. Add 3 cups confectioners' sugar in 3 additions, alternating with 3 tablespoons heavy cream, beating on low speed after each addition. Mix in 1½ teaspoons vanilla extract and ½ teaspoon almond extract, then increase to high speed and beat until light and fluffy, about 2 minutes.
- Step 2: Chill For Proper Consistency
- Cover the bowl with plastic wrap and refrigerate the buttercream filling for at least 1 hour or up to overnight. This chilling step is crucial as it firms up the mixture, making it easier to shape into eggs. The filling should be firm enough to hold its shape but pliable enough to mold without crumbling.
- Step 3: Shape Into Perfect Eggs
- Scoop 1 tablespoon portions of chilled buttercream filling and roll each into a ball between your palms. Flatten slightly to about ½-¾ inch thickness, then use your fingers to thin one end to create an egg shape. Place shaped eggs on a parchment-lined baking sheet and refrigerate again for at least 1 hour until firm.
- Step 4: Master The Chocolate Coating
- Chop 16 ounces of baking chocolate into small pieces and place in a microwave-safe bowl with 1 teaspoon vegetable oil. Microwave in 20-second intervals, stirring after each, until completely melted and smooth. Let the chocolate cool for 5 minutes so it won't melt the cold buttercream filling.
- Step 5: Dip And Decorate
- Working with one egg at a time, place it on a fork and submerge in the melted chocolate. Lift out, tap the fork on the edge of the bowl to remove excess chocolate, and slide onto a parchment-lined baking sheet. If desired, drizzle remaining chocolate over the tops in a decorative pattern. Refrigerate until chocolate is completely set, about 30 minutes.
 Pin it
My first attempt at these candies taught me the importance of thoroughly chilling the buttercream before shaping. I tried to rush the process and ended up with a sticky mess that was impossible to form into neat eggs. Now I make sure to allow plenty of time for chilling, which results in perfectly shaped candies every time.
The Secret To Perfect Wok Technique
High heat is essential for authentic fried rice. My grandmother taught me to heat the wok until smoking before adding oil. Keep ingredients moving constantly to achieve that elusive "wok hei" flavor. Never overcrowd the pan—cook in batches instead. This technique transformed my fried rice into restaurant-quality perfection.
 Pin it
Making The Most Of Leftovers
This dish excels at transforming leftovers into something exciting. I've used roast chicken, holiday ham, and even Thanksgiving turkey with great success. Cut meat into uniform pieces that distribute evenly throughout. Leftover grilled steak adds incredible depth with its smoky edges. Even roasted vegetables bring delightful caramelized sweetness.
Balancing Flavors And Textures
Special fried rice succeeds through balanced components. Char siu provides richness, prawns add sweetness, eggs contribute silkiness, while vegetables offer freshness. The sequence matters—aromatics first build flavor, eggs midway remain distinct, vegetables maintain crispness. Adding spring onions last preserves their brightness for that authentic restaurant finish.
Customization For Dietary Needs
This dish adapts easily to dietary restrictions. For vegetarians, I omit meat, double eggs and add extra vegetables. Low-carb diners enjoy my cauliflower rice version that carries flavors beautifully. For gluten-sensitive guests, tamari replaces soy sauce while ensuring chicken powder is certified gluten-free. Everyone enjoys this beloved dish regardless of restrictions.
Flavor Variations To Try
While the classic vanilla-almond buttercream filling is divine, I've created several variations that have become favorites among friends and family. Coconut lovers appreciate replacing the almond extract with coconut extract and adding 1/2 cup of finely chopped sweetened shredded coconut. For a bright spring flavor, substitute lemon extract for almond and add a teaspoon of fresh lemon zest. Coffee enthusiasts enjoy the addition of 1 teaspoon espresso powder to the filling for a mocha-inspired treat. My personal favorite is a strawberry version made by replacing 1/2 cup of the confectioners' sugar with pulverized freeze-dried strawberries, which adds natural color and intense berry flavor without additional moisture.
Make-Ahead and Storage Tips
These buttercream eggs are perfect for preparing in advance of Easter festivities. The unfilled buttercream mixture can be made up to 3 days ahead and stored covered in the refrigerator - just let it soften slightly at room temperature before shaping. Shaped but uncoated eggs can be refrigerated for up to 5 days or frozen for up to 3 months in an airtight container. The fully finished chocolate-covered eggs keep beautifully in the refrigerator for 2 weeks, though they rarely last that long in my household! For a delightful twist, try freezing the finished candies - the frozen buttercream center develops an ice cream-like consistency that's particularly refreshing during spring celebrations.
Gifting and Presentation Ideas
These elegant buttercream eggs make stunning homemade gifts. For Easter baskets, I wrap individual candies in colorful foil and nestle them among jelly beans and small toys. For hostess gifts, I place them in paper cupcake liners inside small pastry boxes tied with pastel ribbon. At Easter brunch, I arrange them on a tiered serving plate surrounded by fresh flowers for a centerpiece that's both decorative and delicious. For added visual impact, consider using white chocolate for half the batch and dark chocolate for the remainder, creating a striking contrast when displayed together. The professional appearance of these candies belies their simple preparation, making them perfect for gifting to even the most discerning recipients.
Troubleshooting Common Issues
After making hundreds of these buttercream eggs over the years, I've encountered and solved virtually every possible problem. If your chocolate coating appears lumpy, it may have been overheated - next time, heat more gently and stir frequently. If buttercream filling becomes too soft while shaping, return it to the refrigerator for 15-20 minutes before continuing. For chocolate that's too thick for smooth dipping, add an additional 1/2 teaspoon of vegetable oil. If you notice the chocolate beginning to set before you've finished dipping all eggs, place the bowl over a pot of barely simmering water (creating a makeshift double boiler) to maintain the perfect consistency. Remember that working in a kitchen that's too warm can make the process more challenging, so consider adjusting your thermostat before beginning.
 Pin it
These Easter Egg Buttercream Candies have become a cherished tradition in our home, marking the arrival of spring with their sweet indulgence. What began as an experiment has evolved into the treat my family and friends look forward to most each Easter. The combination of velvety buttercream filling and rich chocolate coating creates a candy that's not just delicious but also represents the care and love that goes into homemade treats. While they may be a once-yearly indulgence for most, the joy and excitement they bring make them well worth the effort.
Frequently Asked Questions
- → Can I use different flavors for the buttercream filling?
- Absolutely! While the recipe calls for vanilla and almond extracts, you can easily customize the flavor. Try using different extracts like lemon, orange, mint, coconut, or maple instead of or in addition to the vanilla. For chocolate buttercream, add 2-3 tablespoons of unsweetened cocoa powder. Just remember that some extracts are stronger than others, so adjust the amounts accordingly and taste as you go.
- → Why is my buttercream mixture too soft to shape?
- If your buttercream is too soft, it likely needs more chilling time or possibly more confectioners' sugar. First, try refrigerating the mixture for 30 minutes to firm up. If it's still too soft after chilling, gradually add more confectioners' sugar, 1/4 cup at a time, until you reach a consistency that holds its shape. Also, make sure your butter wasn't too warm when you started - it should be softened but still slightly cool to the touch.
- → Can I color the buttercream to make pastel Easter eggs?
- Yes! To make colored buttercream eggs, divide the buttercream mixture into separate bowls after mixing and before chilling. Add a few drops of gel food coloring (which won't alter the consistency like liquid food coloring might) to each portion and mix well. Then proceed with chilling and shaping as directed. You could also use white chocolate for coating and color it different pastel shades for a beautiful spring assortment.
- → What's the best way to get a smooth chocolate coating?
- For a smooth, professional-looking coating: 1) Make sure the buttercream eggs are very cold when dipping; 2) Let the melted chocolate cool slightly before dipping (too hot and it will melt the buttercream); 3) Use a fork to lift the egg out of the chocolate and tap gently to remove excess; 4) Use a second fork or toothpick to slide the egg onto the parchment paper; and 5) Work in a cool room as warm temperatures can make the buttercream soften too quickly.
- → How can I decorate these buttercream eggs beyond a simple chocolate coating?
- There are many ways to decorate these eggs: 1) Drizzle with contrasting chocolate (white chocolate over dark or vice versa); 2) Before the chocolate sets, sprinkle with colorful sprinkles, chopped nuts, or coconut flakes; 3) Use colored candy melts for coating instead of chocolate; 4) After the coating sets, use a small brush to paint on edible luster dust for a shimmery effect; or 5) Pipe additional designs with royal icing once the chocolate coating is completely set.
- → Why did my chocolate coating crack after it set?
- Chocolate coating can crack if there's a significant temperature difference between the cold filling and room temperature. To prevent this: 1) Let the dipped eggs sit at room temperature for 5-10 minutes before refrigerating; 2) Add the teaspoon of oil to the chocolate as directed, which helps keep the coating more flexible; 3) Make sure the buttercream isn't frozen when dipping; and 4) Store the finished candies in the refrigerator but serve them slightly closer to room temperature for the best texture and to prevent condensation from forming on the chocolate.