
 Pin it
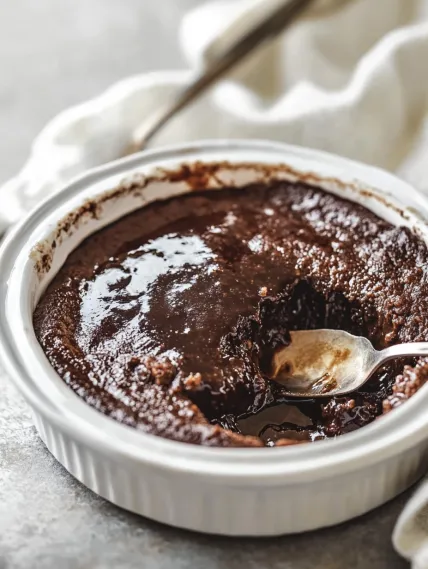
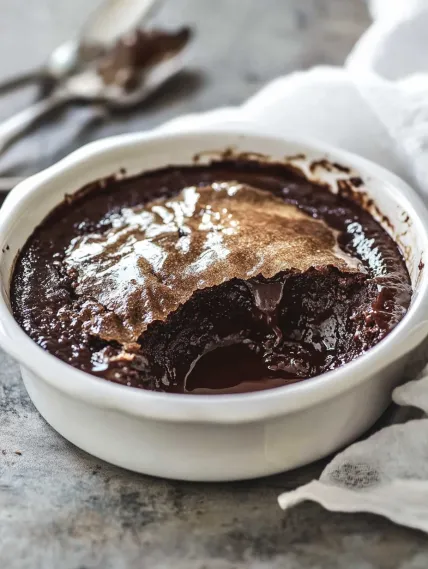
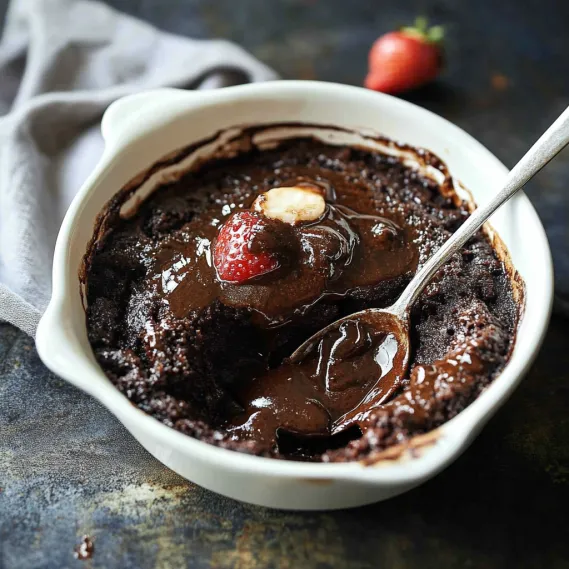
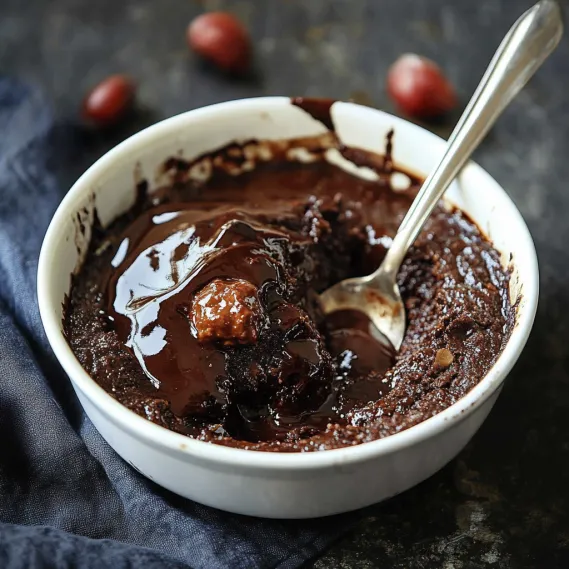
This magical Chocolate Self Saucing Pudding transforms before your eyes into two distinct layers – a moist, tender chocolate cake floating atop a pool of silky chocolate sauce. The beauty lies in its simplicity: one basic chocolate batter topped with a mixture of sugar, cocoa, and hot water that sinks through during baking to create a luscious sauce beneath.
The first time I made this for friends, they couldn't believe the transformation that happened in the oven. When I pulled out a dish of what looked like ordinary chocolate cake and then broke through the surface to reveal the pool of sauce underneath, their eyes widened with delight. The fact that something so magical requires so little effort makes it my go-to dessert for both impromptu gatherings and cozy nights at home.
Essential Ingredients and Selection Tips
- Cocoa Powder: Use unsweetened cocoa powder. Dutch processed gives a richer, deeper chocolate flavor if available, but regular works perfectly well.
- Brown Sugar: Provides a caramel undertone to the sauce. Light or dark brown sugar works equally well.
- Butter: Melted butter enriches the cake batter. Use unsalted for better control of the overall sweetness.
- Milk: Full-fat milk creates the best texture, but reduced-fat will work in a pinch.
- Boiling Water: Must be very hot to help create the sauce layer and activate the baking powder in the cake.
I've discovered that the ratio of water to sugar in the topping affects the final sauce consistency. My recipe uses slightly more water than traditional versions to create a pourable sauce rather than a thick chocolate sludge, which I find more satisfying. The tradeoff is a slightly less smooth surface, but the flavor and texture more than make up for it.
Detailed Cooking Instructions
- Step 1: Prepare Your Baking Dish
- Preheat your oven to 335°F (170°C) and generously grease a 5-6 cup baking dish with butter. The size and shape of your dish will affect the thickness of your cake layer – I prefer using a 10x8-inch dish for the perfect cake-to-sauce ratio, but an 8x8-inch square dish will yield a slightly thicker cake.
- Step 2: Create the Cake Batter
- In a large bowl, whisk together 1 cup flour, 2½ teaspoons baking powder, ⅓ cup white sugar, ¼ cup cocoa powder, and a pinch of salt until well combined. In a separate bowl, mix ½ cup milk, 4½ tablespoons melted butter, 1 egg, and 1 teaspoon vanilla extract. Pour the wet ingredients into the dry ingredients and mix until just combined – the batter will be quite thick.
- Step 3: Prepare the Magic Topping
- Combine 1 cup brown sugar and ¼ cup cocoa powder in a bowl, whisking to remove any lumps. After spreading the cake batter evenly in your prepared baking dish, sprinkle this sugar-cocoa mixture evenly over the entire surface. Gently shake the dish to distribute it in an even layer.
- Step 4: Add the Transformation Element
- Carefully pour 1¼ cups of boiling water over the back of a dessert spoon onto the cocoa-sugar layer, moving the spoon around to distribute the water evenly across the surface. This technique helps prevent the water from creating holes in the sugar layer, though a perfectly smooth surface isn't essential to the success of the pudding.
- Step 5: Bake Until Magical
- Transfer to the oven and bake for 30 minutes, until the top of the cake springs back when lightly touched. The surface will develop a slightly crackly, brownie-like crust while underneath, the water and sugar mixture will have transformed into a rich chocolate sauce. Serve immediately while warm, as the cake continues to absorb the sauce as it sits.
 Pin it
My first attempt at this pudding left me checking the recipe multiple times – I couldn't believe something so simple could create two distinct layers. Now it's my go-to dessert when I want to impress with minimal effort. I've learned not to worry about achieving a perfectly smooth top – those little crusty bits add wonderful texture contrast to each spoonful.
The Secret to Perfect Texture
The magic of these cookies lies in their contrasting textures - crispy bottoms and tender, flavorful fillings. I've found that the key to achieving this is controlling moisture at every stage. First, properly squeezing the salted cabbage removes excess water that would otherwise make the filling soggy. Second, the cornstarch not only binds the filling but also absorbs any remaining moisture. Finally, the cooking technique - first frying, then steaming, then frying again - creates that signature crispy bottom while ensuring the filling cooks through perfectly.
 Pin it
Make-Ahead Magic for Entertaining
One of the greatest advantages of this recipe is its make-ahead flexibility. I often prepare this in stages when hosting: shape and freeze the balls up to a month in advance, bread them the day before (storing them covered in the refrigerator), and then simply bake them before guests arrive. The aroma of these baking fills the house with an irresistible scent that sets the tone for a delicious gathering. For larger parties, I make double batches, keeping the second batch warm in a low oven until needed.
Transforming Leftovers Into New Meals
If you somehow end up with leftover cookies (though this rarely happens in my house!), they can be transformed into entirely new dishes. Crumble them into scrambled eggs for a French-inspired breakfast hash, or slice them and add to a simple green salad with a spicy vinaigrette for a light lunch. My favorite repurposing trick is to nestle halved cookies atop a bowl of creamy grits, creating a satisfying breakfast that carries the flavors into the next day.
 Pin it
Chef's Helpful Tips
- Allow the balls to rest for 5 minutes after baking before serving – this helps set the interior for the perfect bite
- For extra flavor dimension, add a teaspoon of smoked paprika to your panko mixture
- If you have trouble finding cookies locally, order them online from authentic suppliers like Bourgeois Meat Market or The Best Stop
- Serve with multiple dipping options – a spicy remoulade and cool ranch alongside the Louisiana dipping sauce
- For a festive presentation, arrange the balls on a platter with alternating sprinkles of chopped parsley, purple cabbage, and yellow bell pepper to represent the traditional green, purple, and gold
Frequently Asked Questions
- → Why is my sauce too watery?
- If your sauce is too watery, it may be that the pudding needed a few more minutes in the oven. The sauce thickens as it cooks. Also, check that you used the correct measurements for the cocoa powder and sugar in the topping, as these ingredients help create the proper sauce consistency.
- → Can I make this pudding ahead of time?
- This pudding is best served fresh from the oven after standing for just a few minutes. The longer it sits, the more the sauce gets absorbed into the cake. If you need to make it ahead, you can prepare the batter and topping separately, then combine and add the hot water just before baking.
- → Can I use dark chocolate instead of cocoa powder?
- This recipe is specifically designed for cocoa powder, not melted chocolate. Substituting would significantly change the chemistry of how the sauce forms. For the best results, stick with unsweetened cocoa powder as called for in the recipe.
- → What's the best way to reheat leftovers?
- Reheat individual portions in the microwave for 20-30 seconds or until just warm. The chocolate will become melty again, though you won't get as much distinct sauce as when it's freshly made. You can also add a tablespoon of hot water before reheating to help recreate more sauce.
- → Can I make this in individual ramekins instead of one large dish?
- Yes! Divide the batter between 6 ramekins, then sprinkle each with the cocoa-sugar mixture and carefully pour hot water over each. Reduce the baking time to about 15-20 minutes. The individual puddings are done when the tops spring back when lightly touched.
- → What can I serve with this chocolate pudding?
- This pudding is delicious served with vanilla ice cream, whipped cream, or crème fraîche to balance the richness. Fresh berries like strawberries or raspberries also pair wonderfully with the chocolate. For a special touch, dust with powdered sugar just before serving to make it look prettier.