
 Pin it
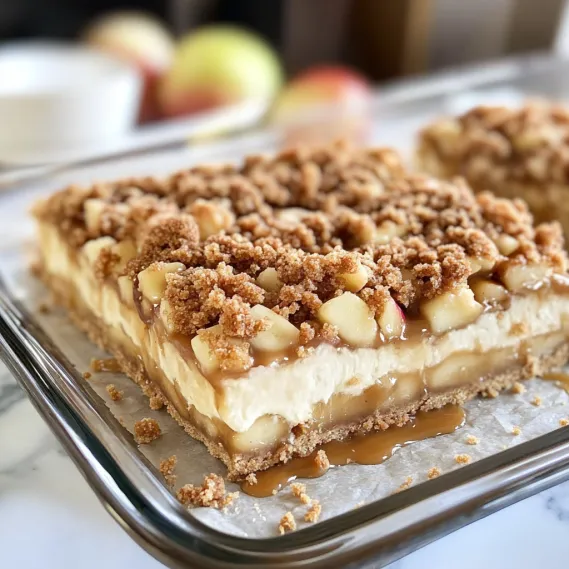
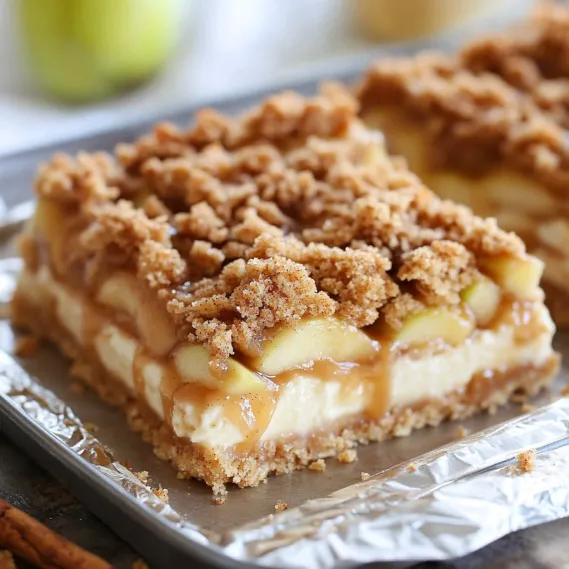
The perfect marriage of buttery shortbread, creamy cheesecake, tender cinnamon-spiced apples, and crumbly streusel creates a dessert that celebrates autumn's finest flavors. These Caramel Apple Cheesecake Bars deliver layer upon layer of contrasting textures and complementary flavors, all crowned with a generous drizzle of caramel sauce. While pumpkin often steals the spotlight during fall, these bars remind us that apples deserve equal billing in the seasonal flavor hall of fame. The combination of tender fruit, warm spices, and decadent caramel captures the essence of autumn in every perfectly balanced bite.
The first time I brought these bars to my neighborhood book club, conversation literally stopped mid-sentence as everyone reached for seconds. My typically reserved neighbor who "doesn't do desserts" asked for the recipe before the evening was over. What makes these bars so special is how each component shines while creating something greater than the sum of its parts - the perfect balance of textures and flavors that keeps you coming back for another bite.
Essential Ingredients and Selection Tips
- Apples: Choose firm, tart-sweet varieties like Honeycrisp, Pink Lady, or Granny Smith that hold their shape when baked. The contrast between the tangy apples and sweet caramel is what makes these bars extraordinary
- Cream Cheese: Use full-fat cream cheese at room temperature for the smoothest, creamiest cheesecake layer. Cold cream cheese will leave lumps no matter how long you beat it
- Butter: Real butter is non-negotiable in both the shortbread base and streusel topping. Its flavor is central to this recipe's success and can't be replicated with substitutes
- Caramel Sauce: While homemade is divine, a high-quality store-bought caramel sauce works beautifully when you're short on time. Look for one made with real butter and cream for the richest flavor
The quality of your ingredients truly matters in a recipe with this many components. When I splurged on local orchard apples and European-style butter with higher fat content, the bars reached a whole new level of deliciousness that had everyone asking what my secret was.
Detailed Cooking Instructions
- Step 1: Perfect the Shortbread Base
- Begin by beating softened butter and sugar until light and fluffy, then mix in flour and salt until just combined. The mixture will be crumbly but should hold together when pressed. Pat this mixture firmly and evenly into your prepared pan, taking care to create a level base with no thin spots. Bake until just barely golden at the edges - about 15 minutes. This pre-baking step ensures the base is sturdy enough to support all the layers to come.
- Step 2: Create the Silky Cheesecake Layer
- While the crust is baking, beat room temperature cream cheese with sugar until completely smooth - no lumps allowed! Add eggs one at a time, incorporating fully after each addition. Stir in vanilla extract, being careful not to overmix once the eggs are added. Pour this velvety mixture over the warm shortbread crust, spreading it into an even layer that reaches all corners of the pan. The warm crust helps the cheesecake settle into a perfect layer.
- Step 3: Prepare the Apple Filling
- Peel, core and thinly slice your apples, then toss them with sugar, cinnamon, and a pinch of nutmeg. The thickness of your apple slices matters - too thick and they won't cook through, too thin and they'll disappear into the cheesecake. Aim for slices about 1/8-inch thick for the perfect texture. Arrange these spiced apple slices evenly over the cheesecake layer, slightly overlapping them for even distribution in every bite.
- Step 4: Mix and Apply the Streusel Topping
- Combine flour, brown sugar, oats, cinnamon and cold cubed butter until the mixture resembles coarse crumbs with some larger butter pieces remaining. Work quickly with your fingertips to maintain those desirable butter pockets that create the perfect streusel texture. Sprinkle this mixture evenly over the apples, covering the entire surface. The streusel adds crucial textural contrast and absorbs some of the moisture from the apples during baking.
- Step 5: Bake, Cool and Finish
- Bake until the streusel is golden brown and the cheesecake is set around the edges but still slightly jiggly in the center. Allow the bars to cool completely at room temperature before refrigerating for at least 2 hours, preferably overnight. This resting time is essential for the flavors to meld and the cheesecake to firm up properly. Just before serving, warm your caramel sauce slightly and drizzle it generously over the cut bars, allowing it to cascade down the sides for dramatic presentation.
 Pin it
My first attempt at these bars taught me an important lesson about patience. I rushed the cooling process and ended up with a messy (though delicious) dessert. Now I always make them the day before I need them, allowing plenty of time for proper chilling. The overnight rest also gives the apple flavor time to permeate throughout the bars, making them even more irresistible.
Serving Inspiration
These bars can be elevated from casual treat to elegant dessert depending on how you serve them. For a dinner party finale, place individual bars on dessert plates with a small scoop of vanilla bean ice cream alongside and an additional drizzle of warm caramel sauce. For a fall gathering, arrange them on a wooden serving board scattered with cinnamon sticks and fresh apple slices for a beautiful rustic presentation. They're equally at home at a bake sale or packed in lunch boxes - versatility is one of their many charms.
 Pin it
Seasonal Adaptations
While apples are the star here, this versatile recipe framework lends itself to seasonal variations. In summer, I've substituted fresh peaches for the apples and added a hint of nutmeg to the streusel with magnificent results. For winter gatherings, adding a tablespoon of bourbon to the caramel sauce creates a sophisticated flavor profile that pairs beautifully with after-dinner coffee. The basic format - shortbread, cheesecake, fruit, streusel - can be adapted endlessly to showcase whatever fruit is at its peak.
Make-Ahead and Storage Tips
These bars are the perfect make-ahead dessert since they actually improve after chilling. They can be fully prepared up to three days in advance and kept refrigerated, though I recommend saving the caramel drizzle until just before serving for the most attractive presentation. The bars also freeze beautifully for up to a month - simply thaw overnight in the refrigerator before serving. For best results when freezing, cut into portions and place parchment paper between layers to prevent sticking.
 Pin it
What began as my brother's cherished recipe has become one of my signature desserts. There's something deeply satisfying about creating a treat with so many different elements that harmonize perfectly. The combination of shortbread, cheesecake, tender apples, crunchy streusel, and silky caramel delivers a symphony of textures and flavors in every bite. While they may require a few extra steps and dishes, these caramel apple cheesecake bars reward your effort with a truly spectacular dessert that captures autumn's finest flavors in portable form.
Frequently Asked Questions
- → Can I make these bars ahead of time?
- Yes! These bars actually benefit from being made ahead. You can prepare them up to 2 days in advance and store them covered in the refrigerator. The caramel sauce can be made up to a week ahead and refrigerated separately. For best results, bring the bars to room temperature for about 20-30 minutes before serving, and warm the caramel sauce slightly before drizzling over the bars.
- → Can I freeze these cheesecake bars?
- Yes, these bars freeze well. Cut them into individual portions, place in an airtight container with parchment paper between layers, and freeze for up to 3 months. Thaw overnight in the refrigerator before serving. I recommend freezing them without the caramel sauce and adding fresh caramel after thawing for the best texture and appearance.
- → What variety of apples works best in this recipe?
- Granny Smith apples are ideal for this recipe because their tartness balances the sweetness of the other components, and they hold their shape well during baking without becoming mushy. If you don't have Granny Smith, other firm, tart apples like Honeycrisp, Pink Lady, or Braeburn will also work well. Avoid softer varieties like Golden Delicious or Red Delicious.
- → Can I use store-bought caramel sauce instead of making my own?
- While homemade caramel sauce offers the best flavor, you can certainly substitute a good-quality store-bought caramel sauce to save time. Look for a thick caramel sauce (often labeled as "caramel topping" rather than "syrup") for the best results. Warm it slightly before drizzling over the bars.
- → My streusel topping melted rather than staying crumbly. What went wrong?
- If your streusel melted instead of maintaining a crumbly texture, the butter was likely too soft or melted. For the best streusel, the butter should be softened but still cool to the touch. You can also try chilling the prepared streusel in the refrigerator for 15 minutes before sprinkling it over the apple layer. Additionally, make sure your oven isn't running too hot, as excessive heat can cause the butter to melt too quickly.
- → How finely should I chop the apples?
- The apples should be chopped into small, approximately 1/4-inch pieces. Pieces that are too large won't cook through properly and may make the bars difficult to cut cleanly, while pieces that are too finely chopped might disappear into the filling. A small to medium dice is perfect – you want distinct pieces of apple that provide texture but aren't so large that they make the bars fall apart when cutting.