
 Pin it
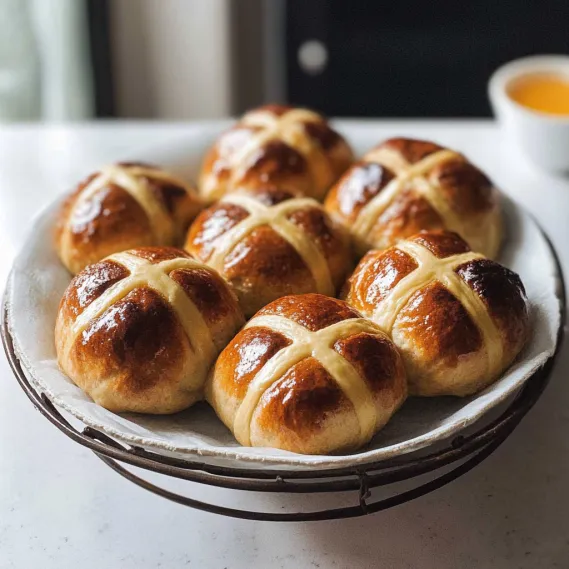
These homemade hot cross buns deliver bakery-quality results with their perfect balance of fluffy texture, aromatic spices, and sweet glaze. The rich, golden dough studded with plump fruit and topped with that iconic cross creates an irresistible Easter treat that fills your home with the most heavenly fragrance. While store-bought versions often contain preservatives that give them an artificial taste, these homemade buns showcase the vibrant freshness of spices and natural ingredients. Best of all, they're surprisingly simple to make with multiple methods to suit your comfort level – whether you prefer using a stand mixer, kneading by hand, or even a no-knead option for absolute beginners.
The first time I made these buns, I couldn't believe the difference in flavor compared to supermarket versions. My grandmother, who has been buying the same brand for decades, took one bite and declared she'd never go back to store-bought again. What makes these special is the freshness of the spices and the perfect balance of soft, fluffy texture with just enough chew to make them satisfying.
Essential Ingredients and Selection Tips
- Flour: Use bread flour for the best structure and rise, though all-purpose flour works in a pinch.
- Yeast: Any type works: instant/rapid-rise (no proofing needed), active dry (needs proofing), or fresh yeast.
- Spices: Fresh, aromatic mixed spice and cinnamon are key to authentic flavor.
- Dried Fruit: Traditional recipes use currants or raisins, but mixed dried fruit adds wonderful variety.
- Butter: Unsalted butter allows you to control the salt level precisely.
I've found that the quality of your spices makes a remarkable difference in the final flavor. If your spices have been sitting in the pantry for more than a year, consider refreshing them before making these buns. The vibrant aroma of fresh spices is what sets homemade hot cross buns apart.
Detailed Cooking Instructions
- Step 1: Prepare Your Perfect Dough
- For the stand mixer method, simply combine all dough ingredients in the bowl and mix on low speed for 5 minutes until smooth and elastic. For hand-kneading, mix ingredients in a large bowl, then turn onto a floured surface and knead for about 10 minutes. The dough should transform from rough and shaggy to smooth and stretchy. When properly kneaded, the dough should spring back when gently poked.
- Step 2: Allow First Rise For Development
- Place the dough in a lightly oiled bowl, cover with plastic wrap to trap warmth and humidity, and let rise in a warm place until doubled in size (about 1-1.5 hours). The ideal temperature is around 25°C/77°F – try a warmed (then turned off) clothes dryer or an oven with just the light on. This rising time develops flavor and creates the soft, fluffy texture.
- Step 3: Form Beautiful, Even Buns
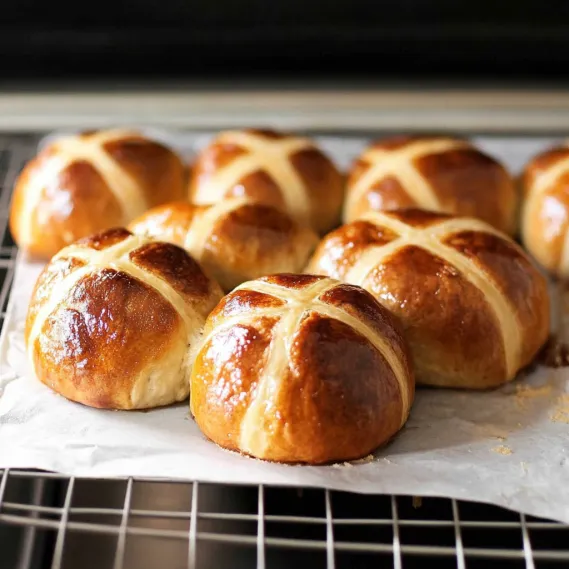
- Punch down the risen dough and shape into a log. Cut into 12 equal pieces, then form each piece into a ball by gathering the edges like a money bag and pinching them together. Place the ball smooth-side up and roll under your palm on the countertop to create tension on the surface. Arrange the balls in a baking dish, leaving small gaps between them for their final rise.
- Step 4: Add The Signature Crosses
- Mix flour and water to create a thick paste that holds its shape but is still pipeable. Transfer to a piping bag or zip-top bag with the corner snipped off. Pipe straight lines across the rows of buns in both directions to form crosses. The key is getting the consistency right – too thin and it will spread during baking, too thick and it will form hard ridges on your soft buns.
- Step 5: Bake And Glaze For Perfect Finish
- Bake in a preheated oven until deeply golden brown (about 22 minutes). While hot, brush with a simple glaze made from warmed apricot jam thinned with a little water. This gives the buns their characteristic shiny finish and adds a subtle sweetness. Allow to cool for at least 20 minutes before serving to prevent a doughy texture.
 Pin it
The first time I attempted these buns, I added too much flour because I was worried about the dough being sticky. The result was dense, hard buns that didn't rise properly. I've learned that embracing a slightly sticky dough creates the most tender, fluffy result. If you're kneading by hand, use the minimum amount of flour possible on your work surface.
 Pin it
The Secret To Perfect Wok Technique
High heat is essential for authentic fried rice. My grandmother taught me to heat the wok until smoking before adding oil. Keep ingredients moving constantly to achieve that elusive "wok hei" flavor. Never overcrowd the pan—cook in batches instead. This technique transformed my fried rice into restaurant-quality perfection.
Making The Most Of Leftovers
This dish excels at transforming leftovers into something exciting. I've used roast chicken, holiday ham, and even Thanksgiving turkey with great success. Cut meat into uniform pieces that distribute evenly throughout. Leftover grilled steak adds incredible depth with its smoky edges. Even roasted vegetables bring delightful caramelized sweetness.
Balancing Flavors And Textures
Special fried rice succeeds through balanced components. Char siu provides richness, prawns add sweetness, eggs contribute silkiness, while vegetables offer freshness. The sequence matters—aromatics first build flavor, eggs midway remain distinct, vegetables maintain crispness. Adding spring onions last preserves their brightness for that authentic restaurant finish.
Customization For Dietary Needs
This dish adapts easily to dietary restrictions. For vegetarians, I omit meat, double eggs and add extra vegetables. Low-carb diners enjoy my cauliflower rice version that carries flavors beautifully. For gluten-sensitive guests, tamari replaces soy sauce while ensuring chicken powder is certified gluten-free. Everyone enjoys this beloved dish regardless of restrictions.
No-Knead Option For Beginners
If you're intimidated by kneading or don't have a stand mixer, the no-knead version is your perfect solution. Simply mix all the ingredients with a wooden spoon until you have a thick, sticky batter-like consistency (similar to a thick muffin batter). Cover and let it rise until doubled, then proceed with shaping and baking as normal. The buns will be slightly less fluffy than the kneaded version and may not keep quite as well, but they're still delicious and far superior to store-bought. I use this method when I'm short on time but still want homemade buns.
Traditional Variations Worth Trying
While traditional hot cross buns contain mixed spice and dried fruit, there are many delicious variations worth exploring. Chocolate chip hot cross buns are a modern favorite, especially with children. For a more adult flavor, try adding orange zest and a splash of brandy to the dough. Apple and cinnamon versions offer a lovely autumnal twist, while cranberry and white chocolate create a festive holiday feel. My personal favorite variation adds finely chopped crystallized ginger for a warming, spicy kick that complements the traditional spices beautifully.
Serving Suggestions And Storage
Hot cross buns are traditionally enjoyed simply split and toasted with a generous spread of butter. For an indulgent breakfast treat, use them to make French toast topped with maple syrup. They also make a wonderful base for bread pudding if you have leftovers that are starting to dry out. To store, keep in an airtight container at room temperature for up to 2 days. For longer storage, freeze in a ziplock bag for up to 3 months and reheat from frozen in a low oven, or split and toast directly from frozen.
 Pin it
These homemade hot cross buns have become an Easter tradition in my family, one that everyone looks forward to each year. There's something magical about the scent of spices and freshly baked bread filling the house on Easter morning. While they may take a little more effort than picking up a package at the store, the superior flavor and satisfaction of creating something truly special make them absolutely worth it. One taste, and I guarantee you'll never want to go back to store-bought again.
Frequently Asked Questions
- → Can I make these hot cross buns ahead of time?
- Yes! You can prepare the dough through the first rise, shape the buns, and then refrigerate them overnight. The next morning, let them come to room temperature (which takes about 2.5-3.5 hours) to complete their second rise, then bake as directed. This make-ahead method actually enhances the flavor as the dough develops overnight.
- → What if I don't have a stand mixer?
- No problem! You can knead the dough by hand on a lightly floured surface for about 10 minutes. The dough is ready when it becomes smooth and elastic, and doesn't tear when you stretch it gently. Hand-kneading takes a bit longer but gives you more tactile control over the dough's development.
- → Can I use different dried fruits instead of sultanas?
- Absolutely! While sultanas are traditional, you can substitute with other dried fruits like raisins, currants, cranberries, or chopped dried apricots. You can also try mixed candied peel for a more traditional English version, or even chocolate chips for a modern twist. Keep the total amount to about 1 1/2 cups.
- → Why did my dough not rise properly?
- Several factors could affect rising: 1) Inactive yeast - always check your yeast's activity if it's not newly purchased, 2) Temperature - the environment might be too cold; try creating a warm spot like a briefly warmed oven or dryer, 3) Too much flour - a dough that's too stiff won't rise well; it should be slightly sticky, 4) Salt-yeast contact - mixing salt directly with yeast can inhibit its activity.
- → How do I know when the hot cross buns are properly baked?
- The best indicator is color - look for a deep golden brown surface. When properly baked, the buns should sound hollow when tapped on the bottom. If they're browning too quickly but don't seem done, tent them with aluminum foil to prevent over-browning while they finish baking.
- → Can these hot cross buns be frozen?
- Yes, these freeze beautifully! Cool the buns completely after baking, then place in a freezer-safe bag or container and freeze for up to 3 months. Thaw at room temperature and then refresh by warming in a 160°C/320°F oven for about 8 minutes covered with foil, or microwave individual buns for 15-20 seconds.