
 Pin it
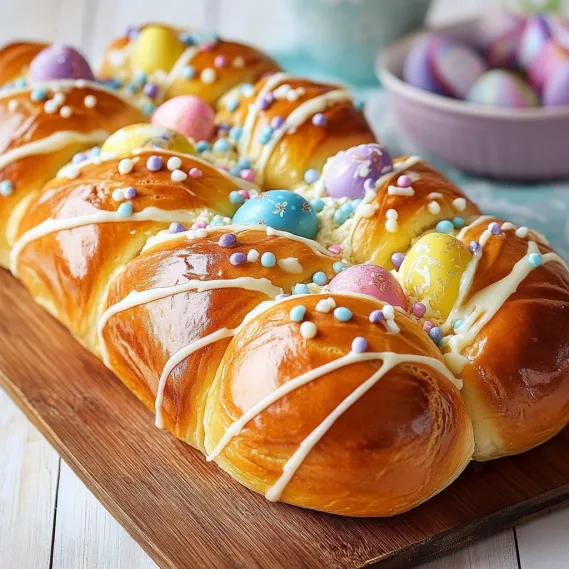
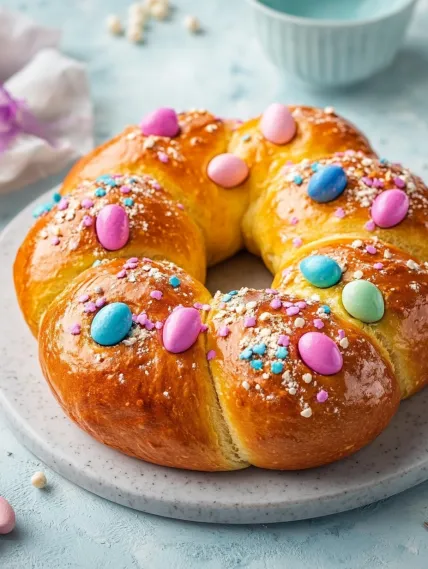
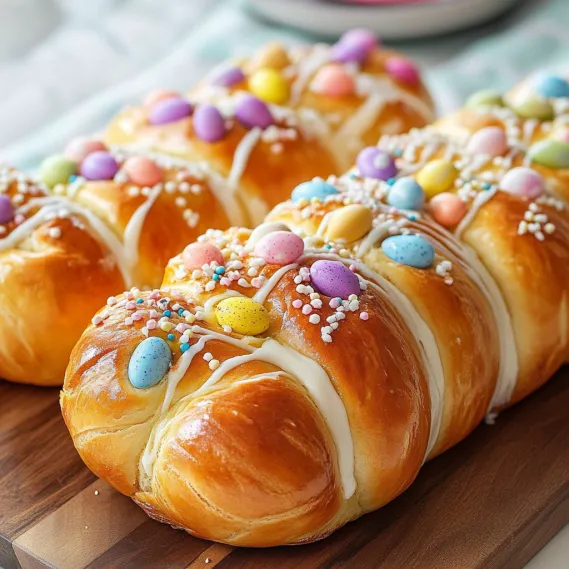
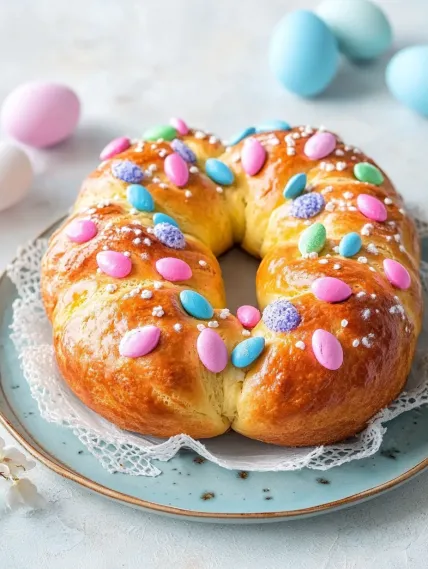
This stunning braided Easter bread brings both deep tradition and festive celebration to your holiday table – a golden, enriched dough gently twisted into an elegant braid cradling vibrant dyed eggs, symbolizing new life and renewal. The slightly sweet, pillowy bread offers a perfect contrast to the colorful eggs nestled within its folds, while a drizzle of glossy white glaze and sprinkle of rainbow decorations add a touch of whimsy. More than just a delicious treat, this show-stopping creation serves as both meaningful tradition and beautiful centerpiece, making it the perfect addition to your Easter celebration.
I first made this bread when searching for traditions to share with my young children at Easter. What began as an experiment has become our most anticipated holiday ritual. My daughter now 12, still insists on dyeing the eggs the night before, while my son carefully places the sprinkles after I drizzle the glaze. The bread's symbolism creates a meaningful moment to discuss spring's renewal while creating something beautiful together.
Essential Ingredients and Selection Tips
- Active Dry Yeast: Fresh yeast is crucial; check expiration dates and store properly in a cool, dry place.
- Butter and Milk: Use high-quality unsalted butter and whole milk for the richest flavor and texture.
- Eggs: Large eggs work best for the dough; any size can be used for decorating.
- All-Purpose Flour: Avoid self-rising flour; unbleached all-purpose creates the perfect texture.
- Food Coloring: For dyeing eggs, use vibrant colors that complement your Easter decor.
I've discovered that using eggs at room temperature produces the most consistent results in both the dough and the dyed eggs. The yeast activates more efficiently, the dough rises more predictably, and room temperature eggs are less likely to crack when placed on the dough for baking.
Detailed Cooking Instructions
- Step 1: Prepare The Perfect Dough
- In a small bowl, combine ¼ cup warm water (110°F) with 1 tablespoon active dry yeast and let stand until foamy, about 5 minutes. In a stand mixer bowl with dough hook, mix the yeast mixture, ¾ cup warm milk, ½ cup sugar, 6 tablespoons melted butter, and 2 beaten eggs until combined. Add 4½ cups flour and 2½ teaspoons salt, mixing until a shaggy dough forms, then beat on medium speed until smooth and elastic, about 5 minutes.
- Step 2: Allow For Proper Rising
- Transfer the dough to a large bowl lightly coated with nonstick spray. Cover with plastic wrap and place in a warm spot until doubled in size, 1 to 1½ hours. Meanwhile, ensure your dyed eggs are completely dry and at room temperature to prevent the colors from bleeding onto the bread during baking.
- Step 3: Master The Braiding Technique
- Turn the risen dough onto a lightly floured surface and divide into 3 equal portions. Roll each portion into an 18-20 inch rope, then braid the ropes together, pinching and tucking the ends underneath. Transfer to a parchment-lined baking sheet and gently nestle dyed eggs into the braid, spacing them evenly. Cover loosely with plastic wrap and let rise until noticeably puffy, 30-45 minutes.
- Step 4: Bake To Golden Perfection
- Preheat oven to 350°F during the final 30 minutes of rising. Brush the loaf with the remaining beaten egg for a glossy finish, then bake until deeply golden brown, 28-32 minutes. Transfer the bread with parchment paper to a wire rack and cool completely for about 1½ hours before decorating.
- Step 5: Add Festive Finishing Touches
- Whisk together 1 cup powdered sugar and 2 tablespoons milk until smooth, adding small amounts of additional milk if needed to create a pourable consistency. Drizzle the glaze over the cooled bread and immediately sprinkle with colorful decorations before the glaze sets. Allow to dry before serving.
 Pin it
My first attempt at this bread was nearly disastrous – I rushed the braiding and didn't tuck the eggs in securely enough, resulting in a messy (though still delicious) creation. Now I take my time with the braiding and make small indentations for the eggs to nestle into, which creates a much more beautiful final presentation.
The Secret To Perfect Wok Technique
High heat is essential for authentic fried rice. My grandmother taught me to heat the wok until smoking before adding oil. Keep ingredients moving constantly to achieve that elusive "wok hei" flavor. Never overcrowd the pan—cook in batches instead. This technique transformed my fried rice into restaurant-quality perfection.
 Pin it
Making The Most Of Leftovers
This dish excels at transforming leftovers into something exciting. I've used roast chicken, holiday ham, and even Thanksgiving turkey with great success. Cut meat into uniform pieces that distribute evenly throughout. Leftover grilled steak adds incredible depth with its smoky edges. Even roasted vegetables bring delightful caramelized sweetness.
Balancing Flavors And Textures
Special fried rice succeeds through balanced components. Char siu provides richness, prawns add sweetness, eggs contribute silkiness, while vegetables offer freshness. The sequence matters—aromatics first build flavor, eggs midway remain distinct, vegetables maintain crispness. Adding spring onions last preserves their brightness for that authentic restaurant finish.
Customization For Dietary Needs
This dish adapts easily to dietary restrictions. For vegetarians, I omit meat, double eggs and add extra vegetables. Low-carb diners enjoy my cauliflower rice version that carries flavors beautifully. For gluten-sensitive guests, tamari replaces soy sauce while ensuring chicken powder is certified gluten-free. Everyone enjoys this beloved dish regardless of restrictions.
Cultural Traditions And Variations
This Easter bread connects to rich traditions across many cultures. In Greece, a similar bread called "Tsoureki" is flavored with orange zest and mahlab, a spice made from cherry pits. Italian "Pane di Pasqua" often includes anise seeds and is shaped into a wreath. My Ukrainian grandmother made a version called "Paska" decorated with religious symbols formed from extra dough. I sometimes incorporate these variations by adding citrus zest to the dough or shaping it into different forms, each offering a window into another culture's celebration of spring renewal. These connections make the bread more than just a recipe—it becomes a bridge between generations and traditions.
Making This A Family Tradition
What I treasure most about this Easter bread is how it brings my family together through shared creation. My mother-in-law taught me her technique for achieving the perfect braid tension, my children have their dedicated roles in decorating, and even my husband, who rarely bakes, participates by creating the perfect environment for the dough to rise. We begin the night before Easter by dyeing the eggs together, sharing stories of our own childhood traditions. The slow process of making the bread—mixing, rising, braiding, rising again—creates natural pauses for connection that have become as meaningful as the finished product. These moments of togetherness are what transform a recipe into a treasured family tradition.
Serving And Presentation Ideas
While this bread makes a stunning centerpiece on its own, I've found several ways to enhance its presentation for maximum impact. For Easter brunch, I place the finished bread in the center of the table surrounded by small bowls of Easter candy and fresh spring flowers. For a more formal Easter dinner, I sometimes make two smaller loaves instead of one large one, placing them at opposite ends of the table with tall taper candles between them. If serving the bread as dessert, I pair it with a honey butter spread and fresh berries on the side. The bread also makes a thoughtful hostess gift when visiting others for Easter celebrations—I simply wrap it in cellophane tied with pastel ribbon and include a small card explaining its symbolism.
 Pin it
This Easter Bread brings together everything I love about holiday traditions – meaningful symbolism, family participation, visual beauty, and delicious results. While it may seem intimidating at first, the process is surprisingly forgiving and the rewards are rich. Even if your braid isn't perfect or some dye transfers to the bread, these "imperfections" become part of your family's unique version of this age-old tradition. In our increasingly fast-paced world, taking the time to create something by hand that connects us to generations past feels both grounding and celebratory – the perfect embodiment of Easter's spirit of renewal.
Frequently Asked Questions
- → Do the eggs in the bread need to be cooked first?
- No, the eggs are placed into the dough raw and will cook as the bread bakes. The heat from the oven will cook the eggs to a hard-boiled consistency. Just make sure the eggs are at room temperature before placing them in the dough to prevent them from affecting the baking time of the bread.
- → How do I dye the eggs for the bread?
- You can dye the eggs using food coloring or Easter egg dye kits. In a bowl, mix 1 cup of hot water, 1 tablespoon of vinegar, and several drops of food coloring. Submerge raw eggs in the mixture until they reach your desired color intensity (usually 5-10 minutes), then remove and let dry completely before using in the bread.
- → Can I make this bread without a stand mixer?
- Yes, you can make this bread by hand. After combining the ingredients to form a shaggy dough, turn it out onto a floured surface and knead by hand for about 10-12 minutes until smooth and elastic. The dough will be slightly sticky but should pull away from the surface as you knead. The process takes a bit more effort but yields equally delicious results.
- → Can I prepare this bread the night before and bake it in the morning?
- Yes, you can prepare the dough through the first rise, then cover it tightly and refrigerate overnight. In the morning, allow the dough to come to room temperature for about 30 minutes before shaping, braiding, and continuing with the second rise. This cold fermentation can actually enhance the flavor of the bread.
- → Is it safe to eat the eggs baked into the bread?
- Yes, the eggs are safe to eat as they'll be fully cooked during the baking process. However, because they're baked for a longer time than traditional hard-boiled eggs, the yolks might be a bit drier and have a slight grayish ring around them. Many people use the eggs primarily as decoration and don't eat them, but they are perfectly safe if you choose to do so.
- → Can I freeze this Easter bread?
- Yes, the bread freezes well without the glaze. Once completely cooled, wrap it tightly in plastic wrap and then aluminum foil or place in a freezer bag. Freeze for up to 1 month. Thaw at room temperature, then warm slightly in a 300°F oven if desired before glazing. If you've included eggs in the bread, note that their texture may change after freezing and thawing.